Monday, June 1, 2009

The Last Chance List is HERE!!

It's here...Stampin' Up has released the Last Chance List of stamps and accessories. Some of the accessories are even on sale for 25-50% off!! Get them before they are gone (accessories sell out DAILY while the stamp sets will be available for the entire month). After June 31 your favorite stamps and accessories will be retired to make room for all of the new items in the 2009-2010 Idea Book & Catalog!

CLICK HERE to head to my online store and see what items are on the list!

Get them before they are gone!!!

Thursday, May 28, 2009

Auction Gift Basket

Each year the YMCA raises money for the Strong Kid's Campaign which provids scholarships to those who cannot afford to join the Y on their own. This year we are holding the Suits, Shoots, and Scores Gala to help in our efforts with all money raised going directly to the Strong Kid's Campaign. There will be food tasting from local restaurants, live music, and live, silent, and Chinese auctions. We have everything from autographed Steeler/Penguin items to weekend getaways, to a piece of cardio equipment being donated. I am on the committee for this event and decided to make a basket of handmade items for one of the silent or Chinese auctions. Here is what I came up with, let me know what you think!

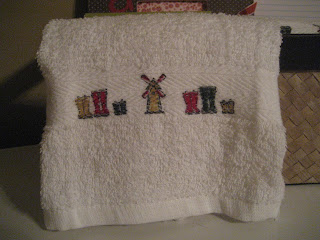
Contains: 8 cards and coordinating envelopes, 2 hand towels, 3 candles (1 stamped and the other 2 just decorated with ribbon), a mini composition notebook, junior legal pad with matching pen and binder clip, and altered picture frame.

I really had a lot of fun making all of these items. The Scene in the Garden stamp set was borrowed from Jen. The great thing about that set is all of the elements are individual stamps, so the pictures you can create are limitless! My favorite thing to do was color the little garden boots! Aren't they adorable??? My favorite item in the basket has to be the mini composition notebook. There were times that I thought about keeping that one for myself! haha I had to keep reminding myself that I can make another one to keep :)

Here is a close up of the items:


(Use Black Stazon when stamping on towels)

...yes the image is stamped on all of the pages!


Stamps: Scene in a Garden, Lots of Thoughts, Big Deal Alphabet, Sanded Background
Ink: Basic Black, Chocolate Chip, Black Stazon
Paper: Chocolate Chip, Kiwi Kiss, Pink Pirouette, Riding Hood Red, Watercolor Paper,Bella Rose DSP
Accessories: SU Markers, Blender Pens, Chocolate Chip and Riding Hood Red Ribbon, Twine, Circle Punches, Scallop Circle Punch, Corner Rounder

Wednesday, May 27, 2009

Summer Hostess Incentive

If you've been thinking about hostessing a party, now is the time to schedule it! Stampin' Up just announced that in June hostesses who have $250-$399 in sales at their party receive an additional $20 in Stampin' Up Hostess dollars and if you hold a party over $400 you get an additional $40!! This is on top of the hostess benefits you already would receive! Contact me ASAP to schedule your party. You provide the friends and I will provide lots of stamping fun!

Monday, May 25, 2009

Another Brayer Card

Happy Memorial Day! I wanted to make a quick card this morning before we head outside and this is what I came up with! Again, I used my brayer and the "Inspired by Nature" stamp set. 

Stamps: Inspired by Nature
Paper: Baja Breeze, Chocolate Chip, Glossy White
Ink: Pretty in Pink, Baja Breeze, Certainly Celery, Chocolate Chip, Versamark
Accessories: Clear EP, Embossing Gun, Paper Piercer and Mat Pack

1. Score 5 x 10 piece of Baja Breeze at 5 and fold on score line.
2. Stamp the flower using Versamark ink on a 4 x 4 piece of Glossy cardstock. Emboss with clear embossing powder.
3. Brayer over the image using Certainly Celery, Baja Breeze, and Pretty in Pink. Let dry for a few minutes and wipe off to reveal image.
4. Stamp sentiment in top left corner using Chocolate Chip.
5. Adhere to 4 1/4 x 4 1/4 piece of Chocolate Chip and adhere to card base.
6. Use paper piercer and mat pack to pierce a border around Chocolate Chip square (make sure to put the mat pack inside the card and not on the back...otherwise you'll have holes on the back of your card too.

Sunday, May 24, 2009

Trendy Trees

Again, another borrowed set....this time from Kim! :) I was looking for leaves for fall wedding invitations I'm going to be making and she included this set too. The layout was inspired from the most recent issue of Stampin' Success, the monthly magazine sent to SU demos. Just another perk of being a demo! Speaking of which, the $75 Special Starter Kit Promotion ends on the 31st so if you're thinking about joining Stampin' Up, don't wait another second! Send me an email and I can let you know how to sign up.

Now onto the card...

Stamps: Trendy Trees
Paper: Natural Ivory, Kiwi Kiss, Chocolate Chip, Whisper White Cardstock, Walk in the Park DSP
Ink: Chocolate Chip, Ruby Red, So Saffron, More Mustard, Old Olive
Accessories: Crimper, Ribbon, Dimentionals

1. Score 5 1/2 x 8 1/2 piece of Chocolate Chip at 4 1/4 and fold on score line.
2. Cut 4 x 2 1/2 piece of each Natural Ivory CS and DSP. Stamp the sentiment on Natural Ivory and run through Crimper--again, thanks Kim ;)
3. Adhere DSP and cardstock to Chocolate Chip base leaving a 1/4 inch border.
4. Wrap a piece of Chocolate Chip ribbon around a 1 1/2 x 4 piece of Kiwi Kiss. Adhere to card base, overlapping the DSP and Ivory cardstock.
5. Stamp trees onto 2 1/4 x 3 1/4 piece of Whisper White. (I used Rock and Roll technique on the tree furthest to the right).
6. Adhere trees to 2 1/2 x 3 1/2 piece of Chocolate Chip. Adhere piece to card with dimentionals.
7. Cut a short piece of ribbon and tie it around the other piece of ribbon to create your bow.

Here is a closeup of the crimped bottom piece...I was wondering how well it would adhere, but it wasn't a problem at all!

Brayered Sympathy

Along with all of my new Designer Series Paper that I ordered and hated to use...I also purchased a brayer. I had used this technique once before at one of Roberta's classes I went to and we made this card:

I decided to try it for myself using another borrowed stamp from Jen (I promise I have my own too haha) Inspired By Nature. It took 5 minutes to make and I'm really excited about how it turned out. I can see myself turning into a brayer-maniac!

I decided to make this a sympathy card for one of my employees who's dog is really sick and about to die at any time. I am a huge animal lover and I know he's really close to him. Is it wrong to have this prepared in advance??

Anyway....here are the details:

Stamps: Inspired by Nature, Close as a Memory
Paper: Kiwi Kiss, Basic Gray, Glossy White Cardstock
Ink: More Mustard, Cameo Coral, Certainly Celery, Old Olive, Basic Black
Accessories: 1 3/8 Circle Punch, Brayer

1. Score 5 1/2 x 8 1/2 piece of Kiwi Kiss at 4 1/4 and fold on score line.
2. Cut a 5 x 3 3/4 piece of Glossy White Cardstock. Punch a circle on a piece of scrap paper and use temporary adhesive to adhere it where you would like.
3. Roll half of your brayer in Cameo Coral and the other half in More Mustard, making sure the colors overlap (you always want to do the lightest color first). Brayer over top half of cardstock, changing the angles so you aren't left with a straight line where your colors change.
4. Tear a piece of scratch paper to create Hills.  Use the top half of the torn sheet to mask off the top, keeping only a small portion of the bottom showing. Brayer with Certainly Celery.
5. Remove mask and place the other half of the torn sheet over the Certainly Celery hills and move the other mask up and over, overlapping with some of the sky. Brayer with Old Olive.
6. Remove all masks.
7. Stamp the grass and sentiment using Basic Black and adhere all three pieces together.
8. I stamped some grass along the bottom of the inside as well.

Saturday, May 23, 2009

Monogram Post It Note Holders

I made these for my co-workers at the Y. When Jen brought over her Delight in Life stamp set, she also brought over a Martha Stewart monogram stamp set. It was the first time I had really seen how clear stamps work. I hope all of the girls like them for their desks! I also got to use some of my new Designer Series Paper! Do you know how hard it was to make the first cut?! They are such beautiful papers that I hate to use them...I know, I'm crazy! Anyway, I really like how these turned out and they were SUPER easy!

Stamps: Martha Stewart Monogram
Paper: Chocolate Chip, Kiwi Kiss, Pumpkin Pie, Baja Breeze, Real Red, Pink Pirouette, Basic Gray, Cameo Coral, Whisper White Cardstock and Sweet Always, Bella Rose, Walk in the Park and Bella Birds DSP
Ink: Same as cardstock
Accessories: 1 1/2, 1 3/8, 1 inch Circle Punches, Velcro, Post It notes

1. Score a piece of 3 1/4 x 7 1/2 cardstock at 2 1/2, 2 3/4, 5 3/4, and 6. 
2. Fold on score lines and adhere Post It notes to inside.
3. Adhere 3 x 2 1/4 piece of DSP to lower flap and 3 x 2 3/4 piece to back of holder.
4. Punch 1 1/2 circle out of coordinating cardstock. Stamp decorative circle on Whisper White and punch out with 1 3/8. Stamp letter in coordinating cardstock using Whisper White ink. Punch out with 1 inch circle. Adhere all three circles together.
5. Adhere top half of circle to top flap of holder.
6. Attach Velcro to circle and DSP to hold it shut.

Sunday, May 17, 2009

Kiwi Kiss Fry Box

This is one of the projects I will be demo-ing at the party I have this coming weekend. I used the template from Stampin' Up's demonstrator site and cut it out using Kiwi Kiss. It was super simple and took max 10 minutes once I figured out what I wanted it to look like (that's always the hardest part!) I will definitely be making these again!! It is filled with six wrapped Hershey's mini candy bars and some crinkled Designer Series Paper to match.

Stamps: Great Friend
Paper: Kiwi Kiss, Basic Gray, Bashful Blue, Walk in the Park DSP
Ink: Basic Gray
Accessories: Ribbon, 1 3/8 inch Circle, 1 1/2 inch Circle, and Scalloped Circle Punches, Twine, Cello Bag

Saturday, May 16, 2009

Black and White Delight

These cards were a lot of fun to make as I've never had a request for all black and white before. I had no clue where to start, so I browsed SCS and combined a few ideas from there to create this set of ten thank you cards and coordinating envelopes. Big thanks to Jen for letting me borrow her Delight in Life stamp set which is from 2007's Sale-A-Bration as well as her Whisper White Craft Ink. Jen is an awesome stamper who before this weekend is over is hopefully going to be joining my downline! Yippeee!!! Between the two of us, I'm sure it won't be long before we own everything in the catalog, just in time for the new one to come out!!!

Stamps: Delight in Life, Pocket Silhouettes
Ink: Basic Black, Whisper White Craft, Versamark
Paper: Whisper White, Basic Black, Basic Gray Cardstock
Accessories: White Organza Ribbon, Dimentionals

1. Score a 5 1/2 x 8 1/2 piece of Whisper White cardstock at 4 1/4 and fold on score line.
2. Stamp the big flower from Delight in Life in Basic Black several times onto a 4 3/4 x 3 1/2 piece of Basic Gray. Use Versamark to stamp the smaller flower in the gaps. 
3. Stamp the Thanks So Much sentiment from Pocket Silhouettes in Whisper White. Heat set to dry.
4. Mat Basic Gray piece onto 5 x 3 3/4 piece of Basic Black cardstock.
5. Tie a knot in a 6 1/2 inch piece of Organza Ribbon and wrap around gray and black pieces. Adhere to cardbase.
6. Stamp big flower onto Basic Black cardstock using Whisper White ink. Heat set to dry and cut out. Adhere over one of the flowers using dimentionals.
7. For the inside, mat a 4 3/4 x 3 1/2 piece of Whisper White to a 5 x 3 3/4 piece of Basic Black. Stamp the small flower in the corner using Basic Black. Also do this in the corner of the envelope.

Thursday, May 14, 2009

Clean and Simple Cards

Recently I've been taking a liking to clean and simple cards. At first it was hard for me to imagine not bombarding a card with various papers and embellishments, but I had to try one...which turned into two! Plus I was really enjoying playing with my markers!

For this first card I basically copied myself only with different colors and used markers instead of pastels...And of course used Flower Fancy! I really need a new flower stamp set!

Stamps: Flower Fancy, Great Friend
Paper: Whisper White, Perfect Plum Cardstock
Ink: Chocolate Chip, Certainly Celery
Acessories: SU Markers, Eyelet Punch

1. Score a 4 1/4 x 11 piece of Whisper White at 5 1/2 and fold on the score line.
2. Cut a 4 1/4 x 2 1/4 strip of Whisper White. Use Certainly Celery, Perfect Plum, and Apricot Appeal markers to color the solid stamp from Flower Fancy and stamp it twice on the strip so that the second image is lighter than the first. Use Chocolate Chip ink to stamp the detail.
3. Use the Eyelet Punch along the bottom of a 4 1/4 x 3 1/2 piece of Perfect Plum and adhere the Whisper White strip to the center. Adhere to card front.
4. Stamp greeting from Great Friend in Certainly Celery. Use Perfect Plum marker to go over the word "friend" and stamp below image.

For the second card I decided to use my Crazy for Cupcakes and Sweet Always DSP since I hadn't used it in a while. I also used the Celebrations stamp that I earned through the Get Connected Promotion in March. 

Stamps: Crazy for Cupcakes, Celebrations
Paper: Whisper White, Chocolate Chip, Regal Rose Cardstock, Sweet Always DSP
Ink: Chocolate Chip
Acessories: Eyelet Punch, SU Markers, Stampin' Pastels, Dimensionals, Ribbon

1. Score 4 1/4 x 11 piece of Whisper White at 5 1/2 and fold on score line.
2. Stamp cupcake image onto a 1 3/4 x 3 piece of Whisper White. Color with SU markers and Stampin' Pastels.
3. Adhere to 2 x 3 1/4 piece of Regal Rose
4. Use Eyelet Punch on the bottom of a 4 1/4 x 3 piece of Chocolate Chip. Adhere piece of 4 1/4 x 2 Sweet Always DSP to center.  
5. Adhere DSP piece to cardfront.
6. Use SU Markers (Pumpkin Pie, Regal Rose, Chocolate Chip) to color directly onto Celebrations Stamp and stamp above DSP.
7. Wrap ribbon around entire card and tie to the left side of the DSP.
8. Adhere the image using dimensionals.

Special Birthday Announcement

Hi All,

I just wanted to let you know that I didn't disappear! By the end of registration for the APEX swap there were actually 17 people who signed up! So needless to say, I've been busy working on cakes! I also am prepping for my workshop tomorrow and a party that I have next week.

But I have a very special announcement. In honor of my birthday (May 29th) I'm giving all of you a present!!! From now until May 26, you will get 5% off your entire order--before tax and shipping--and an additional 5% off any birthday themed item (stamps, die cuts, etc) for a total of 10% off!!! I will place the order on May 26. Only orders that are submitted in person or through email with your credit card info will qualify; unfortunately I cannot apply the discount to online orders. 

To get the biggest bang for your buck, you could also take advantage of Stampin' Up's Designer Series Paper Promotion (buy 3 get one free) that goes until the end of May during my Birthday Special! You would get 4 packs of DSP and/or Textured 12x12 cardstock for $28...that's $12 off!!!

Saturday, May 9, 2009

Wedding Cake

First off, I'm going to start by saying these pictures do not do this project justice!! I earned a spot in the APEX (A Positive Example) swap through Meg Loven due to my performance last quarter. I was super excited as this was my first quarter as a demonstrator :) The theme for the swap is wedding (cards, favors, etc). I, of course, had to do a favor because I love making little treat bags/boxes. I got the template from the SU demonstrator website. Since there are only 9 people in the swap (so far, but tomorrow is the last day, so I should be safe) I only made the bottom layer which consists of 11 slices. There are templates for a second and third layer to make a tiered cake. The slices open up from the bottom which reveals a little tab holding them together, so even after opening they can still be put back together in tact. I couldn't choose between chocolate and vanilla pieces, so I did both! The only thing that bummed me out is that since there is an odd number of pieces, my alternating color pattern got messed up and I ended up with two white pieces next to each other. I know I could squeeze another one in there if I wanted to though...but after 3 hours of making these, I was done for the night! I can't wait to have a reason to make this again (and would really love to do a baby theme!)

Stamps: To Have and to Hold
Paper: Pink Pirouette, Chocolate Chip, Whisper White
Ink: Chocolate Chip
Accessories: White Organza Ribbon, 1 3/8 Circle, 1 1/2 Circle, and Scalloped Circle Punches, SU Markers, Stampin' Pastels, Blender Pen, Dimensionals

Here is an example from the SU website of what a tiered cake would look like:


Click here for my sample of wedding invitations!

Friday, May 8, 2009

Happy Friday!

I was just playing around today before the girls showed up for my workshop and this is what I came up with. It's really different from the cards I usually make as it doesn't have any ribbon! I'm usually the queen of ribbon. But I really really like this one :) And to top it off, the whole thing was made from scraps! Yeah! I also have been obsessed recently with 4 1/4 square cards. I think they are the perfect size!

Stamps: Great Friend, Heard from the Heart
Paper: Basic Gray, Baja Breeze, Whisper White Cardstock, Walk in the Park Designer Series Paper
Ink: Basic Gray
Accessories: SU Markers, Dimensionals

1. Score 8 1/2 x 4 1/4 Baja Breeze at 4 1/4 and fold on score line. 
2. Cut three 1 1/4 x 4 panels of Basic Gray and three 1 1/8 x 3 7/8 of DSP. Adhere the DSP to the Basic Gray. Adhere panels to card base evenly spacing them.
3. Cut 3 1/2 square Basic Gray, 3 1/4 square Baja Breeze, and 3 inch square of Whisper White.
4. Stamp the leaves around the left side and bottom of Whisper White, stamping off twice before re-inking. 
5. Using the So Saffron SU Marker, ink up only the word "happiness" from the Heard from the Heart set. Stamp on Whisper White.
6. Ink the entire greeting with Basic Gray and stamp onto scrap piece of paper. Cut out words and adhere them around "happiness" using dimensionals cut in half. 
7. Mat the Whisper White square to Baja Breeze square and then to Basic Gray square. Adhere the entire piece to the card base.
8. Take a 1/2 x 4 strip of DSP and run it across all of the layers.
9. Stamp the butterfly twice and cut both out. Adhere together using dimensionals and then adhere to card base in upper right corner.

Tuesday, May 5, 2009

Mother's Day Favors

Sunday I'm going to my aunt's house for a Mother's Day brunch and these are the little favors that I'm going to give to my aunts and my grandma. I also made another one for my mom that wouldn't fit in the picture. I will be giving her hers tonight since my sister has to work on Sunday. These were super easy to make and I used my watercolor paper again along with my new set "A Flower for All Seasons". The frog one is my favorite! :) You can find the template for these here (scroll down to the May 1 post). 

These measure 3 x 3, so for my flowers I cut the little plastic container in half leaving me with two sections, each with a flower in them (that way each "pot" would have two flowers). 

Stamps: A Flower for All Seasons
Paper: Cameo Coral, Chocolate Chip Cardstock, Watercolor Paper,Sweet Always Designer Series Paper
Ink: Basic Black
Accessories: SU Markers, Blender Pen, 1 3/8 inch, 1/2 inch and Scalloped Circle Punches,Hole Punch, Chocolate Chip Ribbon

Monday, May 4, 2009

Watercolored Rose

Well my boyfriend in brown (as I call the UPS guy) brought me another box of goodies today! I was very excited about this shipment because I bought the entire set of markers, so I couldn't wait to get my hands on them! I also got some watercolor paper, a paper piercing mat pack, some adhesive, ribbon, and then earned this Hostess Level 1 set "Dear Friend".

I have only ever attempted watercoloring on Whisper White using the Stampin' Pastels and blender pen, and while it looked okay, I couldn't wait to try it on the watercolor paper! Let's just say it's AMAZING! It made me look like a pro watercolorer (if that's a word haha). I also used my new mat pack for the paper piercing. I had done my own version before where I just used a ruler on top of a magazine, but of course this was way easier...and much straighter! I don't particularly care for this card...it's just really not me...but oh well, I was just excited to use my new paper!

Stamps: Dear Friend, To Have and to Hold
Paper: Sage Shadow, Pink Pirouette, Close to Cocoa, Natural Ivory Cardstock and Watercolor paper
Ink: Chocolate Chip
Accessories: Chocolate Chip Ribbon, SU Markers, Blender Pen, Paper Piercer

1. Score 8 1/2 x 5 1/2 piece of Sage Shadow at 4 1/4 and fold on score line. Cut Pink Pirouette to 5 1/4 x 4 and Close to Cocoa to 5 x 3 3/4.
2. Stamp rose image from Dear Friend onto Close to Cocoa using Chocolate Chip ink (stamp off before stamping onto cardstock)
3. Stamp rose onto watercolor paper using Chocolate Chip ink. Watercolor using SU markers and blender pens.
4. Cut to 2 1/2 x 2. Place image on paper piercing mat and pierce a line across the top and bottom. Distress the ends by folding corners and running fingernail down all sides.
5. Take a scrap piece of Chocolate Chip cardstock and crumple it up into a ball. Flatten out and tear to desired size. Adhere watercolored image to Chocolate Chip. 
6. Adhere Close to Cocoa piece to Pink Pirouette piece. 
7. Stamp the outline design from To Have and to Hold and then the greeting from Dear Friend inside. Cut out and punch a hole in each side. Thread Chocolate Chip ribbon through. Wrap around Close to Cocoa and Pink Pirouette. 
8. Adhere image to Close to Cocoa and then adhere everything to the Sage Shadow card base.