Saturday, September 19, 2009

Baby Shower Tri-Shutter Card


Tomorrow is my cousin's baby shower. You may remember these invitations that I made for her. My Mom, Grandma, Sister, and I all went in to get her something from her registry, but of course I was put on card duty! :) I wanted to make her a card that coordinated with her invitations and colors of the shower (pink and brown). I also had a lot of fun making this tri-shutter card (the tutorial can also be found on that post), so I decided to make her card similar. I was excited to incorporate the cute little train from the Teddy and Train since that wasn't used on the invitations. The alphabet set is the retired Big Deal Alphabet. Both of these sets were also used to create the favors that my aunt and I made for the shower (they are little boxes that were stamped to look like baby blocks). I will be posting those, as well as the little gift I made her tomorrow. I can't wait to show you how cute it is!!

Here is the card closed. The train on the front matches up to the inside train when the card is closed...that took a few times to get it right!


And laid out flat. The bear and rattle are popped up with dimentionals
Stamps: Teddy and Train, Big Deal Alphabet
Paper: Kraft, Pretty in Pink, Chocolate Chip, Whisper White Chocolate Chip DSP, Bella Birds DSP
Ink: Basic Black
Accessories: Big Shot, Scalloped Circle Die, Coluzzle, 1 3/8 and 1 1/2 Circle Punches, Scalloped Edge Punch, SU Markers Ribbon, Dimentionals

Wednesday, September 16, 2009

Halloween Treats #3

Here it is...all of the projects that we will be making next Friday (September 25) at my Halloween Treats class!! We will be making the Fancy Favor Box, the Criss Cross Box, one Petal Card Ghiradelli Candy Holder, and today's project...2 little Peanut Butter Cup witch hats. I saw this idea on SCS and knew I had to make them! They are made with the 3rd largest circle on the Coluzzle which is cut in half. I love when you can get 2 of anything from a single shape! The base is just a scalloped circle punched in the same color as the DSP. Again the Cast-A-Spell DSP was used...and no stamping! Talk about super easy for mass producing! These would be great little treats for your Trick or Treaters :)

Tuesday, September 15, 2009

Halloween Treats #2

Today I am sharing part two of my Halloween Treats class. These little guys were made using the Big Shot and seriously took 10 minutes to make both of them; therefore, this is a great project for mass producing. Both were made using the Cast-A-Spell DSP. The Frankenstein is from Batty for You and the tag is from Eat Drink and Be Scary. I do prefer the thicker Old Olive ribbon because it covers the little "hole" from the petal card better (see below), where with the thinner Pumpkin Pie ribbon, you do have to do a little finagling to get the knot in just the right place. The petal card will stay shut on it's own, however, the candy inside is just big enough to cause an opening.

Here is a view with the ribbon untied

And opened to reveal a yummy Ghiradelli chocolate! And the other side of the DSP is a fun surprise too!
Again, my class is September 25 and more details can be found on this post.

Sunday, September 13, 2009

Halloween Treats #1

I couldn't wait to start prepping for my Halloween Treats class as this is my favorite holiday of the year! I will be sharing the projects with you over the next few days (if you get my newsletter, you already know what all of the projects are). The class will be held on Friday, September 25 from 6:00-8:00pm at my home and is $15--and all the candy is included! I know you're going to want to make all of these again to give out to teachers, co-workers, family, etc, so to sweeten the deal if you purchase a pack of the Cast-A-Spell DSP, I will knock $5 off! And if you bring a friend, you will be entered into a drawing for a free stamp set! RSVP by September 21.

The first box is a Criss Cross box and uses the Eat Drink and Be Scary Stamp set along with the DSP.

This second box uses the Fancy Favor die for the Big Shot along with the Batty for You stamp set and DSP.

Saturday, September 12, 2009

Peace on Earth and a Christmas Card Facelift

This is another card I have recently made using the retired Snowfall set I'm borrowing from Jen. I'm not 100% sure if I like it yet or not, but it's a start and I'm pretty sure after a few little tweaks it's going to be made into a set for the craft fair! The main thing I want to change is to move the ribbon a little higher. The first type of ribbon I used was thinner, but when I decided to use this Whisper White ribbon instead, it almost covers the sentiment when it's standing (I have it tilted so you can see everything).

Stamps: Snowfall, Four the Holidays
Paper: Brocade Blue, Basic Gray
Ink: Whisper White
Accessories: Iridescent Ice EP, Heat Gun, Whisper White ribbon, Mat Pack & Paper Piercer, White Gel Pen

I also thought I'd share with you an updated version of a card I made a few weeks ago.

Here is the old version:
And the new:
I decided to punch a hole just underneath the punched ornament and add little silver bungee ribbon. I think I like this much better than the hand drawn ones. (I tried to tie them in bows, however, my nails were not allowing this, so I settled for knots!) What do you think?

Thursday, September 10, 2009

Scalloped Turkey

I have been on a big punch art kick lately (although a lot of today's post was made with the Big Shot Scalloped Circle die). I saw this post on SCS and knew I wanted to try and make it into a card (hers is a gift box). I am really excited with how he turned out! The card was made by cutting 2 Scallop Circles out of Chocolate Chip. Score one of them about an inch down and adhere it to the other one so that the card will open. Three more scallops were cut out of Real Red, Pumpkin Pie, and So Saffron and then cut so that there were only 4 scallops per piece. They were adhered together in the center and then adhered to the Chocolate piece. I used a Chocolate Chip marker to add the detail to the feathers. The feet, beak, and gobbler (not sure if that's what it's really called) were all made from the Scalloped Circle punch just cut to different sizes. His body is the 4th circle on the Coluzzle and his head is the 1 3/8 circle punch. His hat was made with the Word Window punch and then a little square cut from Basic Black and rounded on two corners. The buckle was hand cut from So Saffron and Basic Black and a White gel pen added the details. Finally, I gave him googly eyes! Easy, easy, easy!

The inside was cut with the Coluzzle and stamped using the Holiday Best stamp set (Hostess Level 1) and the Chocolate Chip marker (I eliminated the leaf design)
Stamps: Holiday Best
Paper: Chocolate Chip, Real Red, Pumpkin Pie, So Saffron, Basic Black, Whisper White
Ink: Chocolate Chip Marker
Accessories: Big Shot, Scallop Circle Die, Scallop Circle Punch, 1 3/8 Circle Punch, Word Window Punch, White Gel Pen, Coluzzle

Tuesday, September 8, 2009

"Sweet" Birthday

As promised, here is the gift I made for my Aunt Mel! She came over today to use my Big Shot so I didn't have to wait very long to give it to her :) I couldn't wait to share it with you all! When I was getting the supplies, Joe thought I was making her cupcakes. Then when he saw the finished product he said "you're getting her ingredients for cupcakes for her birthday?!" haha He didn't know there was a $25 gift certificate for Stampin' Up inside the little apron card!


I saw this idea on Becky Roberts' blog and couldn't wait to have a reason to make one! I basically cased her colors and layout for the apron card. There is a link from Becky's blog to the original creator. She gives dimensions for covering the cake mix, but not for the little pouch on the front. I doubt mine is the same as hers, but it worked, so I will share with you the instructions for mine.

Stamps: Crazy for Cupcakes
Paper: Rich Razzleberry, Basic BlackWhisper White, Razzleberry Lemonade DSP
Ink: Chocolate Chip, Versamark
Accessories: Colluzle, SU Markers, Eyelet Border Punch, Large Oval Punch, Scalloped Oval Punch, Melon Mambo Ribbon, Twine, Hole Punch, Silver Brads, Pretty in Pink Ribbon, Dimentionals


1. Measure the width of your box and cut your Rich Razzleberry to be that length x 11 (mine was 5 3/8 x 11). Score at 1 1/2 from one of the long ends. Line it up on the box and figure out your next score line--since different brands will be different sizes. Score on line and do the same for another piece of Razzleberry.
2. Stamp the image from Crazy for Cupcakes in Versamark all over the Razzleberry paper. This is hard to see in these pictures, but if you click here, you can view a bigger picture on SCS. Adhere paper together to form a sleeve for the cake mix (leaving the bottom open for now)
3. Run Melon Mambo Ribbon up and down one side to form the little handle. Adhere under bottom flap and then finish adhering bottom
4. Run the ribbon up the front (starting about 2 inches from the bottom) and adhere on back in line with the handle ribbon.
5. To create the little pouch you will need a 6 1/2 x 3 1/4 piece of Razzleberry. Score it at 3/4 and 1 1/4 on all sides. Cut the bottom two boxes off each side to form a big T. Snip up to second score lines on the bottom to form the flaps and fold box together. Decorate with Razzleberry Lemonade, a strip of Basic Black punched with the Eyelet Border Punch, and the sentiment from Crazy for Cupcakes punched with the Large Oval Punch and adhered to a Scalloped Oval Punch.
6. Adhere pouch to front of box (covering ribbon) using Sticky Strip.

7. Cut a 4 x 10 piece of Razzleberry for the apron card. Score at 5 and fold on the score line.
8. The curves for the card were done by hand and then the same pattern was followed on the DSP. Punch two holes in the top of the DSP and attach silver brads and a small loop of Pretty in Pink ribbon for the strap. Adhere DSP to card base with another strip of Basic Black punched with the Eyelet Border.
9. Stamp cupcake four times on scrap piece of paper. Color and cut out, popping one of the icing layers up on each. Adhere to card.
10. Measure your icing container and cut DSP accordingly. Use Sticky Strip to adhere.
11. Cut two circles from the Coluzzle (again measure it for your specific container)--one from Razzleberry and the other from the DSP. Adhere cupcake to center of circles and adhere to top of container.
12. Wrap Melon Mambo Ribbon around the icing and tie a tag using twine.
13. A gift card (printed off of my computer for SU money) was attached inside using the slit punch.

Monday, September 7, 2009

Little Frankies

Happy Labor Day Everyone! I hope you enjoyed some family time and got to relax. I am so excited to share this Halloween card with you today! I made a full size Frankenstein card last year at Roberta's technique class. I thought it would be fun to make a mini size Frankie this year. I absolutely love the little googley eyes! Originally I had punched a hole punch size circle and colored the black part with a marker, but adhering them was almost impossible (and I'm going to be making quite a few of these for one of my customers, so I knew I had to find another option). Today Jen, Mel, and I went to Pat Catan's (long story, but it was actually to keep Mel out of the house so my Uncle could prep for her surprise birthday party--I will be posting the gift I made for her after I give it to her, so watch for that in a few days, it's super cute)...anyway...I was in googely eye heaven! They had 100 different sizes I swear! I got these small ones and the next size up for use on another card that I will be sharing with you soon.

Here is the card from last year. Isn't he cute too?? He's made out of all circle punches.


Stamps: Teeny Tiny Wishes
Paper: Pumpkin Pie, Elegant Eggplant, Basic Black, Garden Green, Green Galore, Old Olive, Pale Plum, Cast A Spell DSP
Ink: Whisper White
Accessories: Scalloped Edge Punch, Curly Label Punch, Silver Brads, Chocolate Chip SU Marker, Mat Pack and Paper Piercer, Googley Eyes

1. Score a 5 1/2 x 8 1/2 piece of Pumpkin Pie at 4 1/4 and fold on score line.
2. Cut a 3 x 5 1/2 piece of Cast A Spell DSP and two 1 1/2 x 5 1/2 pieces of Elegant Eggplant. Scallop Punch one of those pieces. Dry fit the scalloped piece, DSP, and other Eggplant piece onto the card so that there is about a 1/4 of an inch of Pumpkin Pie on each side. Adhere to card base once you are happy with placement.
3. Cut three 1 5/8 square pieces from Basic Black and three 1 3/4 square pieces from Elegant Eggplant. Adhere together and then adhere to DSP.
4. Punch six Curly Labels (one each of Old Olive, Garden Green, Green Galore, Pale Plum, Elegant Eggplant, and Basic Black). Cut the purple and black pieces in half and then cut one edge to be jaggedy hair. Adhere hair onto green pieces.
5. Use Mat Pack and Paper Piercer to pierce a hole on each side of the label punch and adhere silver brads to form Frankie's bolts.
6. Adhere googley eyes and use Chocolate Chip marker to create mouth and stitch marks.
7. Adhere Frankie's to the square mats.
8. Stamp the sentiment from Teeny Tiny Wishes in Whisper White onto bottom right corner of DSP.

Sunday, September 6, 2009

Thank You Neighbor

Joe and I really lucked out in the neighbor department! Recently, one of our neighbor's, Randy, has been leaving us vegetables on our banister. The other night, Joe and I were eating dinner and I looked out and saw vegetables and something else that I couldn't quite figure out. I went out to see and Randy had left a bone for Cervantes! I thought that was so nice of him, so I decided to make him a card using a picture of Cervantes with his new bone (he hasn't put it down in 2 days!). I also used the Word Window punch and medium heart from the Heart to Heart punch to create a little bone with the sentiment.

The stitching was created by piercing two lines of holes and then drawing an "X" between four of the dots.

Stamps: Teeny Tiny Wishes
Paper: Kraft, Very Vanilla, Chocolate Chip
Ink: Chocolate Chip
Accessories: Heart to Heart Punch, Word Window Punch, Twine, Paper Piercer and Mat Pack, SU Choc Chip Marker, Dimentionals

Here is a close up of the picture I used for the card.

Saturday, September 5, 2009

Christmas Cardinal

No, this image is not Stampin' Up :( Jen had this little guy laying around and I thought he would be good to use for Christmas cards to sell at the craft fair in November. I used the same layout as this card that I made back in July. I like the Christmas one better--sorry for the poor quality, I think my camera was dying when I took this picture.

Stamps: Heard from the Heart, Misc Cardinal Stamp
Paper: Chocolate Chip, Real Red, Old Olive, Very Vanilla, Merry Moments DSP
Ink: Basic Black, Whisper White, Old Olive, Chocolate Chip
Accessories: Big Shot, Top Note Die, Texture Plates, Real Red Ribbon, Sponges, SU Markers, Sanding Block, Dimentionals

1. Score 5 1/2 x 8 1/2 piece of Chocolate Chip at 4 1/4 and fold on score line.
2. Cut a 3 inch square of Very Vanilla, a 3 1/4 inch square of Old Olive, and a 3 1/2 inch square of Real Red.
3. Stamp the cardinal image in the center of Vanilla paper in Basic Black. Stamp branches around edges.
4. Sponge Vanilla piece with Old Olive. Sponges other two squares with Chocolate Chip
5. Adhere all layers and set aside.
6. Run a piece of Real Red through the Big Shot with the polka dot Texture Plate, then again through with the Top Note die. Cut the shape in half. Sand the dots with the sanding block and sponge the edges with Chocolate Chip.
7. Cut a 1 1/2 x 5 1/2 piece of DSP and wrap Real Red Polka Dot ribbon around it. Cut another small piece of ribbon and knot it around the other strip so that the knot is able to move around.
8. Adhere the DSP and Top Note piece to the card base.
9. Ink sentiment from Heard from the Heart in Whisper White. Wipe off all words except "Christmas" with a towel or baby wipe. Stamp word in top 1/3 of the right side.
10. Stamp the other two words in Whisper White onto Real Red and cut out. Adhere above and below the word "Christmas".
11. Adhere cardinal image with dimentionals.

Thursday, September 3, 2009

Froggy Get Well

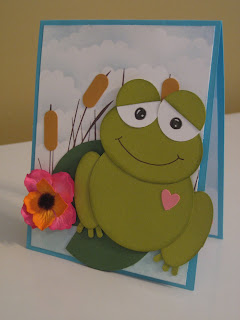
I am very excited to share today's card...mostly because I have had it made for 6 days now, but had to make sure that the recepient received it before I posted it! This card was made for my aunt who has recently found out she has a malignant tumor on her spine. She collects frogs, so I knew her card had to be frog related...however, I don't have any stamps with frogs (other than the Flower for All Seasons stamp set, but that's a small little froggy). In searching frogs on SCS I came across a few punch art frogs and knew that's how I was going to make mine! I must admit that he turned out even cuter than I had imagined in my head!

Stamps: Inspired by Nature, Fun & Fast Notes
Paper: Tempting Turquoise, Garden Green, Old Olive, Pretty in Pink, More Mustard, Whisper White
Ink: Chocoalte Chip, Bashful Blue, Baja Breeze
Accessories: Coluzzle, Large Oval Punch, Heart to Heart Punch, Word Window Punch, Horizontal Slot Punch, Scalloped Circle Punch, 1 1/2 Circle Punch, White Gel Pen, SU Markers, Sponges, Dimentionals, Prima Flower and Brad from Michaels

1. Score 4 1/4 x 11 piece of Tempting Turquoise at 5 1/2 and fold on score line.
2. Cut 4 x 5 1/4 piece of Whisper White. Punch two scalloped circles out of scrap paper and tape together to form cloud template. Starting in the top left corner, use sponge and Bashful Blue ink to create sky, sliding template down and across paper. Do this for 3/4 of page.
3. Take another scrap piece of paper and lay it across the top 3/4 of the page and sponge Baja Breeze ink along the bottom to create the water.
4. Mask off the water portion and stamp the grass from Inspired by Nature in Chocolate Chip several times along the width of the paper.
5. Use the Word Window Punch on More Mustard paper to create the cat tails. To make them smaller, simply punch one, and then slide it back in the punch and punch again to desired length. adhere to various grass pieces.
6. The lilly pad was made using the 5th largest circle on the Coluzzle in Garden Green and then triangle notch was cut out.
7. For the frog you will need 2 large oval punched out, 6 horizontal slot punches, the 4th largest circle and the 3rd largest oval from the Coluzzle, and 3 1-1/2 inch circles (all punched from Old Olive with the exception of two of the 1 1/2 inch circles which are from Whisper White).
8. Sponge all of the Old Olive pieces with Old Olive and assemble. For the eyes, use a black marker and white gel pen. Cut the Old Olive 1 1/2 inch circle in half for eyelids. The small heart from the Heart to Heart punch was also punched from Pretty in Pink. Add a smile with the Chocolate Chip SU Marker.
9. Adhere the frog and lilly pad onto the card base and finish off with a prima flower and fuzzy brad.
10. The inside was created using the same cloud technique and the Get Well Wishes sentiment from Fun and Fast notes along with another small heart.

Tuesday, September 1, 2009

Tri-Shutter Wedding

Hi All! I thought I would take a break from the Christmas cards and show you a tri-shutter card that I recently made. I was always intimidated by this sort of card, but was really surprised at how simple it really was! I have been on a pink and brown kick recently :) The sentiment on the inside was computer generated to personalize the card even more.

Stamps: Friends 24-7, Oval All
Paper: Kraft, Chocolate Chip, Very Vanilla, Bella Birds DSP
Ink: Chocolate Chip, Pretty in Pink
Accessories: Large Oval Punch, Scalloped Oval Punch, Eyelet Border Punch, Coluzzle, Chocolate Chip Ribbon, Mat Pack and Paper Piercer, Dimentionals

1. Cut a 5 1/2 x 12 piece of Kraft and score at 2, 4, 8, and 10.
2. Turn a quarter turn and, using your paper trimmer, cut from the 2 inch score line to the 10 inch line. Repeat on the other side.
3. Score all sections using the mountain/valley folding technique.
4. Open card up and reverse the folding for the center section (if it was a mountain, make it a valley, etc).
5. Decorate and embellish as desired!

If you are more visual, there is a great tutorial on SCS and Beate offers a great video tutorial at the bottom of that page. I need to start taking picture as I make to share with you!

Here is a close up of the inside sentiment...sorry it's a little blurry. It reads: To Ashley & Brian/You share a love that's true/Congratulations and best wishes/On this day you say "I do"

Monday, August 31, 2009

Big on Christmas Joy Fold

Picture overload alert! These cards are so cute in person and I tried to capture it through the pictures (that's why there's a lot of them), but as always, they don't do them justice! This is another set I will be making for the craft fair. These are an example of how easy Stampin' Up makes it to put projects together. Going into it, I knew I wanted to make a Joy Fold card and use the Merry Moments DSP and Big on Christmas stamp set...Stampin' Up did the rest! Based on the piece of DSP I picked, I was able right away to determine my color combination and knew it would match flawlessly...no thinking at all! It probably took me a half hour to make all three of these cards and that included all the coloring, cutting, and faux stitching! Super easy!

Stamps: Big on Christmas
Paper: Garden Green, Old Olive, Real Red, Chocolate Chip, Very Vanilla, Merry Moments DSP
Ink: Chocolate Chip, Real Red, Old Olive
Accessories: SU Markers, Dimentionals, Sponges

Now onto the closeups:


Sunday, August 30, 2009

Two Cased Christmas's

Both of the cards I'm going to share with you are cased, one from SCS and the other from the new Holiday Mini which starts September 1. They are super easy and will be easy for mass producing.

This first one was too cute not to case! Click here to view my inspiration. While I did change the colors and DSP, they are pretty much exactly the same. I absolutely love the simple look.
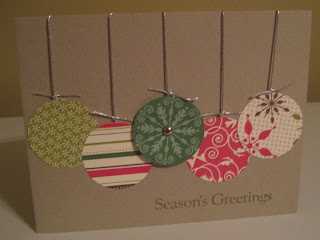
I used the 1 3/8 circle punch to make the ornaments from the new Merry Moments Designer Series Paper. A brad was added to the center ornament and the strings and bows were hand drawn with the Chocolate Chip marker. The sentiment is from the new Four the Holidays set which will be available in the mini.

Stamps: Four the Holidays
Paper: Kraft, Merry Moments DSP
Ink: Old Olive
Accessories: 1 3/8 Circle Punch, Silver Brad, Chocolate Chip SU Marker

This next card was cased from page 4 of the Holiday Mini. I used the Snowfall stamp set (retired) that I'm borrowing from Jen. I used these same colors in this card, however, the more and more I look at that card, the more and more I dislike it. I don't think I will be making it for the craft fair...it will probably be replaced by this one. I used the Four the Holidays set again for the sentiment (that set contains: Merry Christmas, Happy Holidays, Peace on Earth, and Season's Greetings). This card is 4 x 9 (although it might need adjusted if I can't find envelopes for it) and the Whisper White panel is 3 1/2 x 4. The Old Olive strips are 1/2 x 4. Can you tell I made both of these cards the same day? the 1 3/8 circle punch and a brad in the center of a snowflake were used on this one as well. My favorite part is the cute little star cut out and mounted by the sentiment :)

Stamps: Snowfall, Four the Holidays
Paper: Real Red, Old Olive, Whisper White
Ink: Old Olive, Real Red, Chocolate Chip, Whisper White
Accessories: 1 3/8 Circle Punch, Silver Brad

Saturday, August 29, 2009

Happy Anniversary Ladies!

Alright, before I get to my card for today, I have to tell you the story behind it. Last year when word started to get out that I made cards (and before I really got into Stampin' Up), a lady from work asked me to make her a wedding card...for two women! Obviously I didn't have a stamp for that! After googling "lesbian and gay weddings" and sifting through all of the pictures that I did NOT want to see...I found this cute little stick figure of little brides holding hands. I printed and cut them out, colored the hair the appropriate color for each bride and mounted it onto a piece of pink cardstock which had been stamped with Michael's background wedding vow stamp. Tied it off with a ribbon and mounted it to a white card base (all I used back in the day)...needless to say they LOVED it! So much so, that they put it in a frame. Talk about a compliment!

This is that card:

Well, it is coming up on their one year anniversary and I have been asked to make their anniversary card! This year, I am much more prepared with a lot more "stuff" to play with. And I'm really proud of what I came up with!
I found the "bra" tutorial on SCS and knew this was the perfect occasion to make it! I originally made two (you'll see the other one pictured), however, they didn't both fit on the card. The sentiment "the perfect pair" was computer generated.

Stamps: Teeny Tiny Wishes
Paper: Old Olive, Chocolate Chip, Very Vanilla, Walk in the Park DSP
Ink: Chocolate Chip
Accessories: Word Window Punch, Large Oval Punch, Scalloped Oval Punch, Heart to Heart Punch, 1 3/8 and 1 inch Circle Punches, Chocolate Chip and Whisper White Ribbon, Chocolate Chip Button, Dimentionals, Mini-Glue Dots

1. Score 5 1/2 x 8 1/2 piece of Old Olive at 4 1/4 and fold on score line.
2. Punch several 1 and 1 3/8 inch circles out of Old Olive and adhere them to the top half of the card base, cutting those that go off the edge.
3. Wrap Whisper White ribbon around a 5 1/2 x 2 piece of Chocolate Chip and adhere to the bottom half of the card base.
4. Cut a strip of Chocolate Chip ribbon and tie it around the left side of the Whisper White ribbon.
5. For the bra - Punch two large ovals out of Walk in the Park DSP. Overlap the Scalloped Oval punch over the hole left from the oval so that 5 scallops are in the oval. Do this on both. Adhere the "cups" together in the center. Punch two Word Windows out of DSP and attach to make straps. Pop a button in the center of the bra with a mini-glue dot.
6. To create the image of breasts, punch 1 3/8 circles out of Very Vanilla. Adhere to the inside of the bra. Roll the cups around slightly to form a curve.
7. Stack 3 dimentionals under the cups and apply adhesive around edges to adhere to card.
8. Use Word Window Punch to punch out sentiment which was computer generated.
9. Punch Heart to Heart punch on Pretty in Pink and adhere to top left of card.
10. The inside is a 5 1/4 x 4 piece of Very Vanilla with Happy Anniversary from Teeny Tiny Wishes stamped in the right corner. The small heart from the punch is adhered next to it.

This was my extra bra...I gave it to Jen because she knows a lesbian couple and plans to make a similar card for them :) -- it was made using Bella Rose DSP.