Showing posts with label Inspired By Nature. Show all posts

Thursday, September 3, 2009

Froggy Get Well

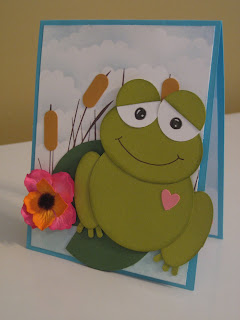
I am very excited to share today's card...mostly because I have had it made for 6 days now, but had to make sure that the recepient received it before I posted it! This card was made for my aunt who has recently found out she has a malignant tumor on her spine. She collects frogs, so I knew her card had to be frog related...however, I don't have any stamps with frogs (other than the Flower for All Seasons stamp set, but that's a small little froggy). In searching frogs on SCS I came across a few punch art frogs and knew that's how I was going to make mine! I must admit that he turned out even cuter than I had imagined in my head!

Stamps: Inspired by Nature, Fun & Fast Notes
Paper: Tempting Turquoise, Garden Green, Old Olive, Pretty in Pink, More Mustard, Whisper White
Ink: Chocoalte Chip, Bashful Blue, Baja Breeze
Accessories: Coluzzle, Large Oval Punch, Heart to Heart Punch, Word Window Punch, Horizontal Slot Punch, Scalloped Circle Punch, 1 1/2 Circle Punch, White Gel Pen, SU Markers, Sponges, Dimentionals, Prima Flower and Brad from Michaels
1. Score 4 1/4 x 11 piece of Tempting Turquoise at 5 1/2 and fold on score line.
2. Cut 4 x 5 1/4 piece of Whisper White. Punch two scalloped circles out of scrap paper and tape together to form cloud template. Starting in the top left corner, use sponge and Bashful Blue ink to create sky, sliding template down and across paper. Do this for 3/4 of page.
3. Take another scrap piece of paper and lay it across the top 3/4 of the page and sponge Baja Breeze ink along the bottom to create the water.
4. Mask off the water portion and stamp the grass from Inspired by Nature in Chocolate Chip several times along the width of the paper.
5. Use the Word Window Punch on More Mustard paper to create the cat tails. To make them smaller, simply punch one, and then slide it back in the punch and punch again to desired length. adhere to various grass pieces.
6. The lilly pad was made using the 5th largest circle on the Coluzzle in Garden Green and then triangle notch was cut out.
7. For the frog you will need 2 large oval punched out, 6 horizontal slot punches, the 4th largest circle and the 3rd largest oval from the Coluzzle, and 3 1-1/2 inch circles (all punched from Old Olive with the exception of two of the 1 1/2 inch circles which are from Whisper White).
8. Sponge all of the Old Olive pieces with Old Olive and assemble. For the eyes, use a black marker and white gel pen. Cut the Old Olive 1 1/2 inch circle in half for eyelids. The small heart from the Heart to Heart punch was also punched from Pretty in Pink. Add a smile with the Chocolate Chip SU Marker.
9. Adhere the frog and lilly pad onto the card base and finish off with a prima flower and fuzzy brad.
10. The inside was created using the same cloud technique and the Get Well Wishes sentiment from Fun and Fast notes along with another small heart.

Monday, May 25, 2009

Another Brayer Card

Happy Memorial Day! I wanted to make a quick card this morning before we head outside and this is what I came up with! Again, I used my brayer and the "Inspired by Nature" stamp set. 

Stamps: Inspired by Nature
Paper: Baja Breeze, Chocolate Chip, Glossy White
Ink: Pretty in Pink, Baja Breeze, Certainly Celery, Chocolate Chip, Versamark
Accessories: Clear EP, Embossing Gun, Paper Piercer and Mat Pack

1. Score 5 x 10 piece of Baja Breeze at 5 and fold on score line.
2. Stamp the flower using Versamark ink on a 4 x 4 piece of Glossy cardstock. Emboss with clear embossing powder.
3. Brayer over the image using Certainly Celery, Baja Breeze, and Pretty in Pink. Let dry for a few minutes and wipe off to reveal image.
4. Stamp sentiment in top left corner using Chocolate Chip.
5. Adhere to 4 1/4 x 4 1/4 piece of Chocolate Chip and adhere to card base.
6. Use paper piercer and mat pack to pierce a border around Chocolate Chip square (make sure to put the mat pack inside the card and not on the back...otherwise you'll have holes on the back of your card too.

Sunday, May 24, 2009

Brayered Sympathy

Along with all of my new Designer Series Paper that I ordered and hated to use...I also purchased a brayer. I had used this technique once before at one of Roberta's classes I went to and we made this card:

I decided to try it for myself using another borrowed stamp from Jen (I promise I have my own too haha) Inspired By Nature. It took 5 minutes to make and I'm really excited about how it turned out. I can see myself turning into a brayer-maniac!

I decided to make this a sympathy card for one of my employees who's dog is really sick and about to die at any time. I am a huge animal lover and I know he's really close to him. Is it wrong to have this prepared in advance??

Anyway....here are the details:

Stamps: Inspired by Nature, Close as a Memory
Paper: Kiwi Kiss, Basic Gray, Glossy White Cardstock
Ink: More Mustard, Cameo Coral, Certainly Celery, Old Olive, Basic Black
Accessories: 1 3/8 Circle Punch, Brayer

1. Score 5 1/2 x 8 1/2 piece of Kiwi Kiss at 4 1/4 and fold on score line.
2. Cut a 5 x 3 3/4 piece of Glossy White Cardstock. Punch a circle on a piece of scrap paper and use temporary adhesive to adhere it where you would like.
3. Roll half of your brayer in Cameo Coral and the other half in More Mustard, making sure the colors overlap (you always want to do the lightest color first). Brayer over top half of cardstock, changing the angles so you aren't left with a straight line where your colors change.
4. Tear a piece of scratch paper to create Hills.  Use the top half of the torn sheet to mask off the top, keeping only a small portion of the bottom showing. Brayer with Certainly Celery.
5. Remove mask and place the other half of the torn sheet over the Certainly Celery hills and move the other mask up and over, overlapping with some of the sky. Brayer with Old Olive.
6. Remove all masks.
7. Stamp the grass and sentiment using Basic Black and adhere all three pieces together.
8. I stamped some grass along the bottom of the inside as well.