Showing posts with label Post-It Holder. Show all posts

Sunday, August 2, 2009

Antique Store Set #3

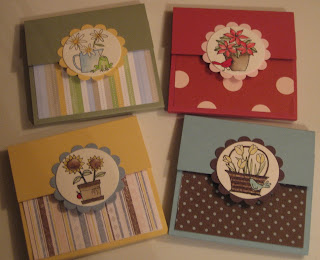
Today was a very busy day! I was going to wait and post these tomorrow, but I was so excited to show them to you all :) The last time Joe and I were at Market Place on Main, we noticed that Tenny, the owner, had a huge basket of Post-It note holders. Joe picked one up and said "you can make these!!" Tenny heard him and said they sold pretty well. So I decided to make a group of Post-It note holders to take down with my card sets. I used the same template from these monogram Post-It note holders I made for the staff at the Y.

The first set I did using In Colors (well, and Green Galore since there isn't a green In Color) as well as my Big Shot with Texture Plates and Great Friend Stamp set. It's hard to tell from the picture, but each holder is embossed using a different Texture Plate. You can see a closer picture here on SCS.
Although, when I saw these Post-It notes at Wal-Mart, I immediately thought of the Soft Subtles color family, I think they also work well paired with these colors too :)
The second set was made with the A Flower for All Seasons stamp set, Designer Series Paper, and watercolor paper.
I also started another card set this evening of onsie cards like to these. I will post it tomorrow once it's all finished.

Saturday, May 23, 2009

Monogram Post It Note Holders

I made these for my co-workers at the Y. When Jen brought over her Delight in Life stamp set, she also brought over a Martha Stewart monogram stamp set. It was the first time I had really seen how clear stamps work. I hope all of the girls like them for their desks! I also got to use some of my new Designer Series Paper! Do you know how hard it was to make the first cut?! They are such beautiful papers that I hate to use them...I know, I'm crazy! Anyway, I really like how these turned out and they were SUPER easy!

Stamps: Martha Stewart Monogram
Paper: Chocolate Chip, Kiwi Kiss, Pumpkin Pie, Baja Breeze, Real Red, Pink Pirouette, Basic Gray, Cameo Coral, Whisper White Cardstock and Sweet Always, Bella Rose, Walk in the Park and Bella Birds DSP
Ink: Same as cardstock
Accessories: 1 1/2, 1 3/8, 1 inch Circle Punches, Velcro, Post It notes

1. Score a piece of 3 1/4 x 7 1/2 cardstock at 2 1/2, 2 3/4, 5 3/4, and 6. 
2. Fold on score lines and adhere Post It notes to inside.
3. Adhere 3 x 2 1/4 piece of DSP to lower flap and 3 x 2 3/4 piece to back of holder.
4. Punch 1 1/2 circle out of coordinating cardstock. Stamp decorative circle on Whisper White and punch out with 1 3/8. Stamp letter in coordinating cardstock using Whisper White ink. Punch out with 1 inch circle. Adhere all three circles together.
5. Adhere top half of circle to top flap of holder.
6. Attach Velcro to circle and DSP to hold it shut.

Saturday, April 4, 2009

Acrylic Frame Post-It Holder


This is a Post-It holder I made for my desk at work. I also plan to make something similar for our Administrative Assistant at work for Administrative Professional's Day on April 22. They are a super easy (and cheap--the frame was $1 at Family Dollar) way to spice up your office!

Stamps: Pocket Silhouettes, Heard From the Heart
Paper: Whisper White, Bashful Blue, Apricot Appeal, Certainly Celery Cardstock and Sale-A-Bration Designer Series Paper
Ink: Chocolate Chip, Bashful Blue, Certainly Celery
Accessories: Bashful Blue and Certainly Celery Ribbon, Corner Rounder, Post-It, Binder Clip, Acrylic Frame

*These are the dimensions for a 5x7 frame, but can be altered to fit any size frame

1. Stamp Pocket Silhouettes with Bashful Blue and Certainly Celery ink onto the bottom of a 4 1/2 x 2 1/2 piece of Whisper White Cardstock. Stamp sentiment from Heard From the Heart with Chocolate Chip ink on top.
2. Use corner rounder to create scalloped border on 4 1/2 x 1 piece of Bashful Blue. Adhere to white cardstock. 
3. Wrap Certainly Celery ribbon where the white and blue meet and adhere to back. 
4. Adhere stamped piece to 5 x 7 piece of Sale-A-Bration DSP.
5. Adhere 3 1/4 square piece of Certainly Celery to 3 1/2 square piece of Apricot Appeal and adhere to bottom of DSP.
6. Slide DSP into frame so that the stand is at the top. 
7. Tie a small piece of Certainly Celery and Bashful Blue ribbon into a knot and adhere directly onto frame overtop of the Certainly Celery ribbon. Adhere Post-Its in the center of the Certainly Celery square.
8. Adhere 3/4 square of Certainly Celery cardstock to top of binder clip and clip onto frame.