Showing posts with label Punched Art. Show all posts

Sunday, October 28, 2012

Halloween Party at the Rudy's

This past weekend I had two of my best friends, Melissa and Carrie, along with their husbands and kids over for lunch (Melissa has Mila who is 3 1/2 months and Carrie has Reese who is 9 weeks). It gave me an excuse to plan some sort of Halloween themed shindig, since it is my favorite! I kept it pretty simple and made Zuppa Toscana in the crock pot, garlic breadsticks, Italian sandwiches from Giant Eagle and then some miscellaneous treats and appetizers. Melissa brought a side dish and Carrie brough cupcakes for dessert. My favorite thing was my "pumpkin" cheeseball! Thank you Pinterest for the idea! hehe

I also had little gifts for the girls and their moms, which I couldn't just wrap up any old way! I got little Halloween books for the kids and candles from my neighbor who pours her own candles for Mis and Carrie. I thought they turned out super cute. Reese's name could have been spaced out a little better, but that's okay.

I used the Big Deal Alphabet set to stamp the names on tissue paper after wrapping the books and oval and circle punches for the pumpkins. The stems were cut and attached to the back and the little green squiggle is a pipe cleaner. I tied it off with some raffia. The candles were wrapped in small sandwich bags with half of a doily folded over the top. The stamp set was Holiday Best, which I colored with markesrs and I used the scalloped oval to punch it. I finished it off with a small piece of raffia and the tiny binder clips! Needless to say, they loved them! :)


Here is a picture of the spread. It's sort of blurry, but you get the idea. I wish I had taken more pictures.

And, about 30 minutes before they arrived, I couldn't figure out where to put the silverware. So I pulled out some old baby jars (I never throw them away, because you never know when one will come in handy!). I wrapped scrap ribbon around the top and punched out two more pumpkins. The baby food jars themselves looked cute, but I love adding extra details.

Wednesday, September 5, 2012

Look Whooo's Graduating!

I know school just started and graduation parties have come to an end, but today I'm sharing a card that I made last year for my mom to give to someone she knew who was graduating. I absolutely LOVE punch art projects and was super excited at how cute this little guy turned out!

The eyes and belly were made from various sizes of circle punches, the body and wings were made from the scalloped circle punch, the feet were the horizontal slot punch, the head was the tab punch (I can't remember it's official Stampin' Up name) and the hat was made from the curly label punch with a thin rectangle on top. I free hand cut the nose. The diploma was made by rolling up a small rectangle of cardstock and tying it off with some shiny string.

You could use this punch art owl for many different occasions: put a birthday hat on him or a balloon in his hand, have him sitting next to a pumpkin, or dress him up like Santa...the possibilities are endless!

Thursday, September 10, 2009

Scalloped Turkey

I have been on a big punch art kick lately (although a lot of today's post was made with the Big Shot Scalloped Circle die). I saw this post on SCS and knew I wanted to try and make it into a card (hers is a gift box). I am really excited with how he turned out! The card was made by cutting 2 Scallop Circles out of Chocolate Chip. Score one of them about an inch down and adhere it to the other one so that the card will open. Three more scallops were cut out of Real Red, Pumpkin Pie, and So Saffron and then cut so that there were only 4 scallops per piece. They were adhered together in the center and then adhered to the Chocolate piece. I used a Chocolate Chip marker to add the detail to the feathers. The feet, beak, and gobbler (not sure if that's what it's really called) were all made from the Scalloped Circle punch just cut to different sizes. His body is the 4th circle on the Coluzzle and his head is the 1 3/8 circle punch. His hat was made with the Word Window punch and then a little square cut from Basic Black and rounded on two corners. The buckle was hand cut from So Saffron and Basic Black and a White gel pen added the details. Finally, I gave him googly eyes! Easy, easy, easy!

The inside was cut with the Coluzzle and stamped using the Holiday Best stamp set (Hostess Level 1) and the Chocolate Chip marker (I eliminated the leaf design)
Stamps: Holiday Best
Paper: Chocolate Chip, Real Red, Pumpkin Pie, So Saffron, Basic Black, Whisper White
Ink: Chocolate Chip Marker
Accessories: Big Shot, Scallop Circle Die, Scallop Circle Punch, 1 3/8 Circle Punch, Word Window Punch, White Gel Pen, Coluzzle

Monday, September 7, 2009

Little Frankies

Happy Labor Day Everyone! I hope you enjoyed some family time and got to relax. I am so excited to share this Halloween card with you today! I made a full size Frankenstein card last year at Roberta's technique class. I thought it would be fun to make a mini size Frankie this year. I absolutely love the little googley eyes! Originally I had punched a hole punch size circle and colored the black part with a marker, but adhering them was almost impossible (and I'm going to be making quite a few of these for one of my customers, so I knew I had to find another option). Today Jen, Mel, and I went to Pat Catan's (long story, but it was actually to keep Mel out of the house so my Uncle could prep for her surprise birthday party--I will be posting the gift I made for her after I give it to her, so watch for that in a few days, it's super cute)...anyway...I was in googely eye heaven! They had 100 different sizes I swear! I got these small ones and the next size up for use on another card that I will be sharing with you soon.

Here is the card from last year. Isn't he cute too?? He's made out of all circle punches.


Stamps: Teeny Tiny Wishes
Paper: Pumpkin Pie, Elegant Eggplant, Basic Black, Garden Green, Green Galore, Old Olive, Pale Plum, Cast A Spell DSP
Ink: Whisper White
Accessories: Scalloped Edge Punch, Curly Label Punch, Silver Brads, Chocolate Chip SU Marker, Mat Pack and Paper Piercer, Googley Eyes

1. Score a 5 1/2 x 8 1/2 piece of Pumpkin Pie at 4 1/4 and fold on score line.
2. Cut a 3 x 5 1/2 piece of Cast A Spell DSP and two 1 1/2 x 5 1/2 pieces of Elegant Eggplant. Scallop Punch one of those pieces. Dry fit the scalloped piece, DSP, and other Eggplant piece onto the card so that there is about a 1/4 of an inch of Pumpkin Pie on each side. Adhere to card base once you are happy with placement.
3. Cut three 1 5/8 square pieces from Basic Black and three 1 3/4 square pieces from Elegant Eggplant. Adhere together and then adhere to DSP.
4. Punch six Curly Labels (one each of Old Olive, Garden Green, Green Galore, Pale Plum, Elegant Eggplant, and Basic Black). Cut the purple and black pieces in half and then cut one edge to be jaggedy hair. Adhere hair onto green pieces.
5. Use Mat Pack and Paper Piercer to pierce a hole on each side of the label punch and adhere silver brads to form Frankie's bolts.
6. Adhere googley eyes and use Chocolate Chip marker to create mouth and stitch marks.
7. Adhere Frankie's to the square mats.
8. Stamp the sentiment from Teeny Tiny Wishes in Whisper White onto bottom right corner of DSP.

Sunday, September 6, 2009

Thank You Neighbor

Joe and I really lucked out in the neighbor department! Recently, one of our neighbor's, Randy, has been leaving us vegetables on our banister. The other night, Joe and I were eating dinner and I looked out and saw vegetables and something else that I couldn't quite figure out. I went out to see and Randy had left a bone for Cervantes! I thought that was so nice of him, so I decided to make him a card using a picture of Cervantes with his new bone (he hasn't put it down in 2 days!). I also used the Word Window punch and medium heart from the Heart to Heart punch to create a little bone with the sentiment.

The stitching was created by piercing two lines of holes and then drawing an "X" between four of the dots.

Stamps: Teeny Tiny Wishes
Paper: Kraft, Very Vanilla, Chocolate Chip
Ink: Chocolate Chip
Accessories: Heart to Heart Punch, Word Window Punch, Twine, Paper Piercer and Mat Pack, SU Choc Chip Marker, Dimentionals

Here is a close up of the picture I used for the card.

Thursday, September 3, 2009

Froggy Get Well

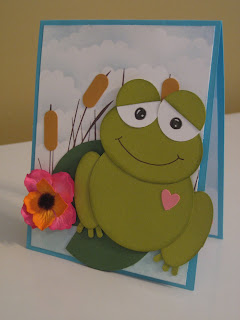
I am very excited to share today's card...mostly because I have had it made for 6 days now, but had to make sure that the recepient received it before I posted it! This card was made for my aunt who has recently found out she has a malignant tumor on her spine. She collects frogs, so I knew her card had to be frog related...however, I don't have any stamps with frogs (other than the Flower for All Seasons stamp set, but that's a small little froggy). In searching frogs on SCS I came across a few punch art frogs and knew that's how I was going to make mine! I must admit that he turned out even cuter than I had imagined in my head!

Stamps: Inspired by Nature, Fun & Fast Notes
Paper: Tempting Turquoise, Garden Green, Old Olive, Pretty in Pink, More Mustard, Whisper White
Ink: Chocoalte Chip, Bashful Blue, Baja Breeze
Accessories: Coluzzle, Large Oval Punch, Heart to Heart Punch, Word Window Punch, Horizontal Slot Punch, Scalloped Circle Punch, 1 1/2 Circle Punch, White Gel Pen, SU Markers, Sponges, Dimentionals, Prima Flower and Brad from Michaels

1. Score 4 1/4 x 11 piece of Tempting Turquoise at 5 1/2 and fold on score line.
2. Cut 4 x 5 1/4 piece of Whisper White. Punch two scalloped circles out of scrap paper and tape together to form cloud template. Starting in the top left corner, use sponge and Bashful Blue ink to create sky, sliding template down and across paper. Do this for 3/4 of page.
3. Take another scrap piece of paper and lay it across the top 3/4 of the page and sponge Baja Breeze ink along the bottom to create the water.
4. Mask off the water portion and stamp the grass from Inspired by Nature in Chocolate Chip several times along the width of the paper.
5. Use the Word Window Punch on More Mustard paper to create the cat tails. To make them smaller, simply punch one, and then slide it back in the punch and punch again to desired length. adhere to various grass pieces.
6. The lilly pad was made using the 5th largest circle on the Coluzzle in Garden Green and then triangle notch was cut out.
7. For the frog you will need 2 large oval punched out, 6 horizontal slot punches, the 4th largest circle and the 3rd largest oval from the Coluzzle, and 3 1-1/2 inch circles (all punched from Old Olive with the exception of two of the 1 1/2 inch circles which are from Whisper White).
8. Sponge all of the Old Olive pieces with Old Olive and assemble. For the eyes, use a black marker and white gel pen. Cut the Old Olive 1 1/2 inch circle in half for eyelids. The small heart from the Heart to Heart punch was also punched from Pretty in Pink. Add a smile with the Chocolate Chip SU Marker.
9. Adhere the frog and lilly pad onto the card base and finish off with a prima flower and fuzzy brad.
10. The inside was created using the same cloud technique and the Get Well Wishes sentiment from Fun and Fast notes along with another small heart.

Sunday, June 28, 2009

Punch Pal Piggy

Oink! Oink! That's "Happy Birthday Mom" in Pig! haha Why am I making a pig reference for my mom's birthday??? Well she LOVES pigs! She's collected them my whole life, so it was only appropriate for me to make her a pig-related birthday gift! This little guy was made using the large oval punch and coluzzle. I love his little piggy tail on the back! Inside holds a gift certificate. I made this a few weeks ago and couldn't wait to post it, but I know she reads my blog and didn't want to ruin the surprise!

Stamps: Sanded Background
Paper: Regal Rose, Chocolate Chip, Whisper White, Basic Black Cardstock
Ink: Chocolate Chip
Accessories: Coluzzle, Large Oval Punch, Big Shot, Top Note Die, Ribbon, Chocolate Chip SU Marker, Mat Pack, White Gel Pen, Small Craft bag, Sponge

For Top Note Bag:

1. Cut two Top Notes from Chocolate Chip using the Big Shot. Stamp Sanded BG stamp using Chocolate Chip ink.
2. Cut craft bag to fit inside the Top Notes. Attach one to one of the Top Notes.
3. Use the large oval punch to punch a handle in the Top Note and through the bag.
4. Adhere other Top Note to other side of bag. Line up oval punch with previously punched one to punch through the other Top Note. Tie handle with Chocolate Chip ribbon.

For Punch Pal Piggy:

1. Cut out two ovals using 4th largest circle on Coluzzle on Regal Rose cardstock. Also punch 3 ovals using large oval punch.
2. Sponge around edges using Chocolate Chip Ink.
3. Line up mat pack in the center of one of the 3 ovals to create snout. Color two with Chocolate Chip marker.
4. Free hand cut two half ovals out of Whisper White and two half ovals out of Basic Black to create eyes. Use gel pen to draw highlights. Adhere to back of snout.
5. Use dimentionals to attach snout to largest oval.
6. Take the other 2 ovals and fold the tops down to create ears. Adhere to back of largest oval and adhere to Top Note bag.
7. Take a small strip of Regal Rose and wrap around a pencil to create curly tail. Adhere to other large oval. Adhere to back of Top Note bag so that it lines up with the head on the other side.