Wednesday, October 28, 2009

Halloween Treats

As promised, here are the treats that I made for my fellow Directors at work! I am usually the first one in the office, so I went around to each of their offices and left all of these on their desks. I loved hearing each one of them come in...they all knew I was the Halloween elf! :)

Here is a picture of all 3 treats that I gave out.

A close up of the frappachino bottles

And the tops of the bottles

Little Ghiradelli chocolate holders made from the Top Note Die

The inside

And my favorite...the mummified Hershey's bar!

Sunday, October 25, 2009

M&M Matchbooks

Hello Everyone! I'm so excited that it's Halloween week! Today's post is the first of several Halloween treats for staff at work. These M&M Matchbook's were cased from this post on SCS. I made a total of 30 to give to my Health & Fitness staff at the Y.

Stamps: Batty for You
Paper: Basic Black, Cast A Spell DSP
Ink: Basic Black, Pumpkin Pie, Old Olive, Elegant Eggplant
Accessories: Scalloped Circle Punch, 1 3/8 Circle Punch, 1 1/2 Circle Punch, Staples, Sponges

I ran out of M&Ms and had to use a few packs of peanut M&Ms and while they turned out okay, it was hard to get the belly band around the bigger candies.

Tuesday, October 20, 2009

Got a brand new stamp? Here's a tip!

As I was making some treats for my co-workers at the Y, I used my "Trick or Treat" sentiment from the Hostess set Holiday Best for the first time. I used SU markers to color directly onto the stamp and when I stamped it for the first time, it wasn't very pretty. Has this ever happened to you? Well, I have a solution! Simply take your sanding block and rub it across the stamp a few times. You'll be able to see the difference just in how the ink transfers to the stamp...and the result on paper is even more amazing.

The tag on the bottom was before sanding, and the one on top is after. Pretty cool, huh?
I am so anxious to share these and the other Halloween Treats I have made! There are 67 total (28 of one design and then 13 each of 3 other designs). I will start revealing them next Monday. My next few posts will show you a little more from the Open House! I hope you are getting lots of ideas from those pictures!

Sunday, October 18, 2009

Halloween Birthday

This coming weekend I'm going to visit my friend and she asked me to make her a birthday card for her sister...who's birthday is on Halloween Day! This is what I came up with! I love this Little Boo stamp set, so I couldn't resist using him. This card is similar to this card, as the front is shorter than the back. In this case, the inside has a place to put a gift card. When it's laid flat you can see the black DSP and see the complete design. I'm going to be really sad when Halloween's over and I have to put away my Cast-A-Spell DSP. I can't wait to show you the treats I made for my co-workers and employees at work! I am going to save them for next week though, just so the secret doesn't get out :)

Stamps: Little Boo, Teeny Tiny Wishes
Paper: Pumpkin Pie, Basic Black, Old Olive, Elegant Eggplant, Whisper White, Cast-A-Spell DSP
Ink: Old Olive, Basic Black, Pumpkin Pie
Accessories: Scalloped Edge Punch, 1 inch Circle Punch, Pumpkin Pie Ribbon, Sponges

1. Score a 4 1/4 x 11 piece of Pumpkin Pie at 5 1/2 and fold on score line.
2. Cut 1/4 of an inch off of the front piece and then punch the bottom edge with the Scalloped Edge Punch. Sponge with Basic Black ink.
3. Stamp the Little Boo ghost three times, one each in Pumpkin Pie, Old Olive and Basic Black. Punch out with 1 inch circle punch. Also punch out a Pumpkin Pie and Old Olive circle with the same punch.
4. Mat a 1 1/2 x 3 3/4 piece of Elegant Eggplant to a 1 5/8 piece of Pumpkin Pie. Punch two scrap pieces of Old Olive with the Scalloped Edge Punch and cut to 3 3/4. Mat onto other layers.
5. Adhere punched circles as shown.
6. Cut a 4 1/2 x 4 piece of Basic Black and a 4 1/4 x 3 3/4 piece of DSP. Adhere to card base.
7. Adhere image layer onto DSP.
8. Tie Pumpkin Pie ribbon around front layer.
9. For the inside, cut a piece of DSP 4 1/4 x 1 7/8. Use the 1 inch circle punch to punch a half circle where the gift card can be pulled out.
10. Adhere to inside, taping only the outside three sides.
11. Stamp sentiment from Teeny Tiny Wishes.

On a different note...I wanted to show you my crazy Halloween nails. I love to get my nails done and I used to get designs all the time. To save a little money I went back to just getting one color, but for Halloween I decided to bring the fun designs back!
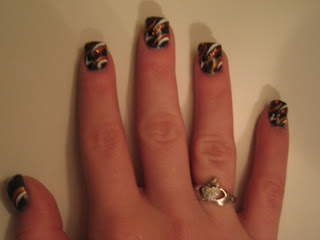
Isn't my nail tech talented? She does it all by hand, not airbrush! (speaking of hands, I'm not sure why my fingers look so chubby! haha) Anyway, they look even better in real life because the black has a little sparkle to it :)

Friday, October 16, 2009

More Display Boards

Here are some more of the display boards from the Open House. I hope to have a few cards to share with you in the next couple of days. I was away at a Staff Training Retreat for my "real job" at the Y, so I wasn't able to get much done since Tuesday.

Tuesday, October 13, 2009

Open House Punched Art

Just a quick post today to show you one of my favorite cards from the Open House. This cheerleader was created using various Stampin' Up punches and was made by Cindy Mawhinney, a very talented stamper in the StampinStone's demonstrator group. I absolutely love her scalloped circle punch hair! How cute!!
To see more cards using Punch Art, click here.

Sunday, October 11, 2009

Open House Display Boards

As promised, here are a few pictures of the display boards from the Open House yesterday. Click on the images to enlarge!

Holiday Board (do any of the 3D Halloween items look familiar??)


Roberta's board--with a few of my samples too :)

Saturday, October 10, 2009

Holiday Open House Pictures

Well I just got back from the Holiday Open House and it was a definite success!! There were over 50 people there, some of whom had never stamped before and just read about the event in the newspaper. I have many pictures of display boards and cards that were demo'd, so today I'm just going to show you the four demo stations. I will post a few pictures each day...wait until you see some of these display boards...there are some talented ladies in this group!

Kathy demonstrated how to make a Recessed Window Card
Roberta demonstrated the new Build A Bear stamp sets and Big Shot dies.

Sue demonstrated how to use the Shimmer Paint in various ways.
And I demonstrated the Watercolor Roses that I have been sharing with you. I saved three of the roses that I demo'd today because the result was absolutely breathtaking! I used Summer Sun, Pretty in Pink, and Regal Rose reinkers and after everything blended I had shades of orange as well, so it looks very fall like. I can't wait to make a project with them!

Friday, October 9, 2009

Another Watercolored Flower

Well I managed to crank out another card with the watercolor reinker technique that I mentioned yesterday. Of all three cards this one is my favorite. I cased the layout from a card I saw on Splitcoast (I forgot to bookmark it though...sorry).

This is the card standing...you can really see the shimmer of the flower from this angle!

And laying down to show the inside layer. It's hard to see, but the butterfly was colored with coordinating SU markers :)

And from the side
I will try to take lots of pictures tomorrow at the Open House to share with you! I also have been working on some super cute Halloween Treats for staff at work. I don't want to post them too early in case any of them read my blog :) More fun stuff to come though...

Stamps: Oval All, Fifth Avenue Floral
Paper: Pale Plum, Ballet Blue, Whisper White, Shimmery White
Ink: Whisper White, Basic Gray, Brocade Blue and Ballet Blue Reinkers
Accessories: Eyelet Border Punch, Large Oval Punch, Scalloped Oval Punch, Whisper White Ribbon, Aquapainter, Clear EP, Heat Gun, SU Markers, White Gel Pen

Thursday, October 8, 2009

Watercolor Roses

This coming Saturday is the Open House that I am going to be helping with for the StampinStones demonstrator group. I first mentioned it way back in August in this post. My job in the Open House is to demo the Watercolor Rose Technique (also known as reinker watercoloring). While I really like the effect of this technique and think it is awesome to demonstrate...I am not a big fan of the Fifth Avenue Floral set! haha Coming up with samples for my table was rough! Here are two that I have done. I still have a few more flowers made up and will hopefully have another one or two samples made before then. If you haven't seen this technique, take a peek at Patty Bennett's tutorial (complete with video!). It's really easy and definitely is a WOW technique...it works great with this set, I'm just not a rosey-rose type of girl!

I used Brocade Blue and Ballet Blue reinkers for this card

And Summer Sun, Pretty in Pink, and Regal Rose reinkers for this card

It's hard to capture the shimmer of the flowers on camera, but they are beautiful in real life!

Tuesday, October 6, 2009

Candy Corn Treat

You may remember this post where I told you about my aunt who recently found out she has cancer on her spine. Well, my mom and I went to visit her in Ohio this past weekend and I took this little gift for her. The template is the same one I used for the box in this post and an PDF for how to make it can be found through Papertrey Ink. The pumpkins were made using the Coluzzle and Large Oval Punches along with a little sponging to give it some depth. The stem was hand cut and the little green strip was rolled around a pencil to form the curling effect. The sentiment was tied onto the Pumpkin Pie ribbon with twine and was punched out using the Large Oval Punch and the Scalloped Oval Punch.

Stamps: Great Friend
Paper: Natural Ivory, Kraft, Pumpkin Pie, Chocolate Chip, Old Olive
Ink: Pumpkin Pie
Accessories: Large Oval Punch, Scalloped Oval Punch, Pumpkin Pie Ribbon, Old Olive Striped Ribbon, Twine

Saturday, October 3, 2009

I'm Back :)

Thanks for being patient with me and for all of the nice comments and emails. I have really taken a break recently and I feel it's really helped. I've been working out more, spending more time with Joe and the 4 legged kids and...I actually WANTED to stamp today :) Plus it didn't help that my dog ate my last bookmark (you may remember this post) and I just got a new book from the library. I couldn't bring myself to use anything but something stamped! Since Halloween is my favorite holiday and I haven't used this cute Little Boo stamp yet, I thought it would be perfect for project. I will continue to post sporadically when I make projects or cards (although I do have some lined up). But from now on, most of the things you will be seeing will be things I made because I wanted to, because I'm not going to be taking many, if any, orders for a while.

Stamps: Little Boo
Paper: Pumpkin Pie, Basic Black, Whisper White, Cast A Spell DSP
Ink: Basic Black
Accessories: 1 inch, 1 3/8, 1 1/2, and Scalloped Circle Punches, Paper Piercer, Pumpkin Pie Ribbon, Dimentionals

1. The image was stamped in Basic Black onto Whisper White. The "boo" and pumpkin were colored with SU markers and then punched out with a 1 inch circle punch.
2. That was layered onto a 1 3/8 circle punched from the Cast A Spell DSP.
3. Those were layered onto a 1 1/2 inch circle of Basic Black, which was finally layered onto a Pumpkin Pie Scalloped Circle.
4. I used my paper piercer to punch holes in all of the scallops.
5. Steps 1-4 were repeated so that you have two scalloped pieces.
6. Cut two long strips of Pumpkin Pie striped ribbon. Adhere to the back of one of the scalloped pieces. Use dimentionals to adhere the other scalloped image to the first, sandwiching the ribbon between the two layers.