
 This is the card I made for Mila's 1st Birthday. It felt good to pull out some of my old card stuff and actually make a card by hand and not on the computer (although, I think it's obvious how much I love MDS!). This card is actually 5x7 and the only reason I made it that big is because that was the only size envelope I had :). I cut a doily in half and wrapped it around the pink cardstock and adhered it to the back. I then cut the banner strips from Stampin' Up Designer Series Paper and added the pearls. The ribbon was tied on and the sentiment was stamped using Chocolate Chip ink. You can't tell from the picture, but the pink cardstock is adhered with dimensionals. The sentiment is from the "Crazy for Cupcakes" stamp set.
Showing posts with label Crazy for Cupcakes. Show all posts
Showing posts with label Crazy for Cupcakes. Show all posts
Sunday, July 21, 2013
Birthday Card
This is the card I made for Mila's 1st Birthday. It felt good to pull out some of my old card stuff and actually make a card by hand and not on the computer (although, I think it's obvious how much I love MDS!). This card is actually 5x7 and the only reason I made it that big is because that was the only size envelope I had :). I cut a doily in half and wrapped it around the pink cardstock and adhered it to the back. I then cut the banner strips from Stampin' Up Designer Series Paper and added the pearls. The ribbon was tied on and the sentiment was stamped using Chocolate Chip ink. You can't tell from the picture, but the pink cardstock is adhered with dimensionals. The sentiment is from the "Crazy for Cupcakes" stamp set.
Monday, September 3, 2012
I'm Back!...and Birthday Invitations
Well...it's been three long years since I've posted! When I decided to start posting again, I couldn't believe it had been that long!! A lot has changed in those three years. I got married in May 2011, started a new job in July 2011 and just had a baby in February 2012! I've still been stamping and making cards/invitations though. I'm really trying to grow my little business and right now they only advertising I've been doing is on Facebook where I have an album dedicated to my cards. I wanted to start blogging again so I can refer people who aren't on Facebook to it and hopefully continue to spread the word! I love mass producing...so weddings, showers, birthday parties, you name it and I can make an invite for it. Just shoot me an email and we can go over details.
For my first post back I'm going to share with you invitations I made for my friend, Shakira's, daughter's first birthday (which was today). I used digital scrapbook paper for most of it (I can't remember where I downloaded it from...I got it several months ago). The ladybug wings were created by punching a scalloped circle, drawing black spots, folding them in half and placing them over a clipart ladybug. I was really pleased with how they turned out. And how could they not be cute with that picture on the front?!


 I also thought I'd share the card that I made for her. It's cased pretty much 100% off this card I found on Pinterest. I used the 1 3/8 circle punch to make the lollipop pieces and I pulled paper from my bag of scraps, so I'm not even sure which all colors I used :) The sentiment is from the Crazy for Cupcakes set.

That's all for now! I have lots of projects to share that I've made over the past three years, plus I have some I'm working on now. I'm going to aim to post 3-4 times per week, so watch out for more frequent posting!
For my first post back I'm going to share with you invitations I made for my friend, Shakira's, daughter's first birthday (which was today). I used digital scrapbook paper for most of it (I can't remember where I downloaded it from...I got it several months ago). The ladybug wings were created by punching a scalloped circle, drawing black spots, folding them in half and placing them over a clipart ladybug. I was really pleased with how they turned out. And how could they not be cute with that picture on the front?!
Ladybug theme

Close up of the wings

The inside


That's all for now! I have lots of projects to share that I've made over the past three years, plus I have some I'm working on now. I'm going to aim to post 3-4 times per week, so watch out for more frequent posting!
Tuesday, September 8, 2009
"Sweet" Birthday
As promised, here is the gift I made for my Aunt Mel! She came over today to use my Big Shot so I didn't have to wait very long to give it to her :) I couldn't wait to share it with you all! When I was getting the supplies, Joe thought I was making her cupcakes. Then when he saw the finished product he said "you're getting her ingredients for cupcakes for her birthday?!" haha He didn't know there was a $25 gift certificate for Stampin' Up inside the little apron card!


I saw this idea on Becky Roberts' blog and couldn't wait to have a reason to make one! I basically cased her colors and layout for the apron card. There is a link from Becky's blog to the original creator. She gives dimensions for covering the cake mix, but not for the little pouch on the front. I doubt mine is the same as hers, but it worked, so I will share with you the instructions for mine.
Stamps: Crazy for Cupcakes
Paper: Rich Razzleberry, Basic BlackWhisper White, Razzleberry Lemonade DSP
Ink: Chocolate Chip, Versamark
Accessories: Colluzle, SU Markers, Eyelet Border Punch, Large Oval Punch, Scalloped Oval Punch, Melon Mambo Ribbon, Twine, Hole Punch, Silver Brads, Pretty in Pink Ribbon, Dimentionals

1. Measure the width of your box and cut your Rich Razzleberry to be that length x 11 (mine was 5 3/8 x 11). Score at 1 1/2 from one of the long ends. Line it up on the box and figure out your next score line--since different brands will be different sizes. Score on line and do the same for another piece of Razzleberry.
2. Stamp the image from Crazy for Cupcakes in Versamark all over the Razzleberry paper. This is hard to see in these pictures, but if you click here, you can view a bigger picture on SCS. Adhere paper together to form a sleeve for the cake mix (leaving the bottom open for now)
3. Run Melon Mambo Ribbon up and down one side to form the little handle. Adhere under bottom flap and then finish adhering bottom
4. Run the ribbon up the front (starting about 2 inches from the bottom) and adhere on back in line with the handle ribbon.
5. To create the little pouch you will need a 6 1/2 x 3 1/4 piece of Razzleberry. Score it at 3/4 and 1 1/4 on all sides. Cut the bottom two boxes off each side to form a big T. Snip up to second score lines on the bottom to form the flaps and fold box together. Decorate with Razzleberry Lemonade, a strip of Basic Black punched with the Eyelet Border Punch, and the sentiment from Crazy for Cupcakes punched with the Large Oval Punch and adhered to a Scalloped Oval Punch.
6. Adhere pouch to front of box (covering ribbon) using Sticky Strip.

7. Cut a 4 x 10 piece of Razzleberry for the apron card. Score at 5 and fold on the score line.
8. The curves for the card were done by hand and then the same pattern was followed on the DSP. Punch two holes in the top of the DSP and attach silver brads and a small loop of Pretty in Pink ribbon for the strap. Adhere DSP to card base with another strip of Basic Black punched with the Eyelet Border.
9. Stamp cupcake four times on scrap piece of paper. Color and cut out, popping one of the icing layers up on each. Adhere to card.
10. Measure your icing container and cut DSP accordingly. Use Sticky Strip to adhere.
11. Cut two circles from the Coluzzle (again measure it for your specific container)--one from Razzleberry and the other from the DSP. Adhere cupcake to center of circles and adhere to top of container.
12. Wrap Melon Mambo Ribbon around the icing and tie a tag using twine.
13. A gift card (printed off of my computer for SU money) was attached inside using the slit punch.

Tuesday, August 11, 2009
Bermuda Bay Birthday
 Thursday is my grandma's birthday and this is the card I made for her :) I was browsing SCS for a layout and came across this card and decided to base my card off her layout. I've had the library clips for a while now but anytime I tried to use them I wasn't happy, so when I clipped it onto this card, I was trilled to see that I liked how it looked!
Stamps: Fun and Fast Notes, Crazy for Cupcakes
Paper: Bermuda Bay, Basic Black, Whisper White
Ink: Basic Black
Accessories: SU Markers, Blender Pen, 1 3/8, 1 1/2 and Scalloped Circle Punches, Large Oval and Scalloped Oval Punch, Scalloped Edge Punch, White Gel Pen, Bermuda Bay Ribbon, Library Clips, Mat Pack and Paper Piercer, Dimentionals
1. Score an 8 1/2 x 4 1/4 piece of Bermuda Bay at 4 1/4 and fold on score line.
2. Stamp bird from Fun and Fast notes onto Whisper White twice and watercolor using SU Markers and blender pens.
3. Punch one of the birds out with the 1 3/8 circle punch--you will cut off part of the flower.
4. On the other image, cut out the bird and flower. Adhere to punched out image using dimentionals for the bird and adhesive for the flower.
5. Adhere entire image to a 1 1/2 circle punched from Basic Black. Set aside.
6. Paper pierce a border around a 4 x 3 piece of Whisper White.
7. Punch the scallop border along a 4 x 2 piece of Basic Black using the Scalloped Edge Punch and "dot" a white gel pen on each scallop. Dry fit onto card base and then adhere together so that there is a 1 inch margin of Bermuda Bay at the top. Do not adhere to card base yet.

8. Wrap ribbon around and adhere in back. Take another strip of ribbon and tie it around the ribbon to form the bow. Adhere to card base.
9. Stamp sentiment from Crazy for Cupcakes onto Bermuda Bay and punch out using Large Oval. Adhere to a Basic Black punched Scalloped Oval. Adhere above ribbon using dimentionals.
10. Adhere bird image to card base using dimentionals (doubling them for extra pop).
11. Clip the library clip onto the side.
12. The inside contains a 4x4 piece of Basic Black and a 3 3/4 x 3 3/4 Whisper White matted in the middle.
Tuesday, August 4, 2009
Antique Store Set #5

Hello! You are reading my 100th post! I can't believe it. When I started this blog in March, I never thought it would only take me 4 months to reach 10,000 hits and post 100 times. Thanks to all of you for supporting my blog and visiting regularly! This is my final card set for the Market Place on Main (all that's left is candles). I wanted to make a variety of styles to give him to see what works best, so this set is much more "fun" than the other sets. I CASED this card from SCS. It was very simple to make these and they were done in about an hour. And I just can't get enough of the color combination. I'm really sad that I used my last sheet of this style DSP. Time to order more!!!

When I started to think about how I wanted to package them, I didn't want to make another one of the boxes I have been making. I wanted something for the cards to "stand" in. I searched all over SCS and couldn't find any template for what I was visioning...so, I decided I was going to make my own box template! Boy, I didn't realize what I was in for. Although it only took me about 15 minutes to figure it out, my brain hurt after it was all said and done! I cut my cardstock to 8 1/2 x 6 and scored it at 2 inches all the way around. Cut the flaps and assemble. It seems way to easy for the time it took me to think of it! The DSP is 1 3/4 square for the sides and 1 3/4 x 4 for the front and back. See the template below for cutting/scoring.

Stamps: Crazy for Cupcakes
Paper: Melon Mambo, Whisper White, Razzleberry Lemonade DSP
Ink: Basic Black
Accessories: Big Shot, Scallops 2 Die, 1 3/8, 1 1/2, and Scallop Circle Punches, Crystal Effects, Coluzzle, Horizontal Slot Punch, Melon Mambo Ribbon, Dimentionals, SU Markers, Blender Pen

And, all of the cards with the box. I was the mad photographer with this set, can't you tell? :)
Thursday, June 4, 2009
Ice Cream Cone Birthday
 Isn't this adorable?? According to Joe, this is the cutest card I've ever made! I received my latest SU order yesterday and couldn't wait to play with my Crystal Effects! I've seen the idea of ice cream cones on SCS and decided to try it for myself! I had also seen the cone made using Big Shot texture plates, but since I don't have the texture plates, I decided to improvise and use a crimper. I think it worked! :) I also wish I would have moved the sentiment up a little bit, but oh well!
Stamps: Crazy for Cupcakes
Paper: Chocolate Chip, Pink Pirouette, Creamy Caramel, Whisper White, Riding Hood Red, and Kiwi Kiss Cardstock, and Bella Rose DSP
Ink: Chocolate Chip
Accessories: Crimper, Scalloped Circle Punch, Buttons, Ribbon, Big Shot, Top Note Die, Sticky Strip, Chocolate Chip Marker
1. Score 4 1/4 x 11 piece of Chocolate Chip cardstock at 5 1/2 and fold on score line.
2. Adhere 4 x 5 1/4 piece of DSP.
3. Use your Big Shot to cut out a Top Note in Pink Pirouette. Do the same with the ribbon and adhere it to the pink Top Note using Sticky Strip.
4. Punch three scalloped circles and cut off half of the scallops to form the top of the "scoop". Adhere together as shown.
5. Run 3 x 1 1/2 piece of Creamy Caramel through a crimper twice in two different directions to form checked pattern. Cut into a triangle and adhere to ice cream pieces.
6. Use SU Chocolate Chip Marker to free hand draw fudge topping. Apply Crystal Effects and let dry.
7. To make the cherry I traced around a button and cut it out, but a 1/2 inch circle punch would work too. Cut a little divit in the top where stem will come out. Cut stem out of Kiwi Kiss and attach to cherry. Adhere to ice cream cone using Sticky Strip.
8. Adhere ice cream to card base.
9. Stamp sentiment in Chocolate Chip ink in bottom left corner of Top Note.

10. Cut small slivers of Kiwi Kiss cardstock and thread through buttons. Adhere buttons.
Thursday, May 14, 2009
Clean and Simple Cards
Recently I've been taking a liking to clean and simple cards. At first it was hard for me to imagine not bombarding a card with various papers and embellishments, but I had to try one...which turned into two! Plus I was really enjoying playing with my markers!

For this first card I basically copied myself only with different colors and used markers instead of pastels...And of course used Flower Fancy! I really need a new flower stamp set!
Stamps: Flower Fancy, Great Friend
Paper: Whisper White, Perfect Plum Cardstock
Ink: Chocolate Chip, Certainly Celery
Acessories: SU Markers, Eyelet Punch
1. Score a 4 1/4 x 11 piece of Whisper White at 5 1/2 and fold on the score line.
2. Cut a 4 1/4 x 2 1/4 strip of Whisper White. Use Certainly Celery, Perfect Plum, and Apricot Appeal markers to color the solid stamp from Flower Fancy and stamp it twice on the strip so that the second image is lighter than the first. Use Chocolate Chip ink to stamp the detail.
3. Use the Eyelet Punch along the bottom of a 4 1/4 x 3 1/2 piece of Perfect Plum and adhere the Whisper White strip to the center. Adhere to card front.
4. Stamp greeting from Great Friend in Certainly Celery. Use Perfect Plum marker to go over the word "friend" and stamp below image.

For the second card I decided to use my Crazy for Cupcakes and Sweet Always DSP since I hadn't used it in a while. I also used the Celebrations stamp that I earned through the Get Connected Promotion in March.
Stamps: Crazy for Cupcakes, Celebrations
Paper: Whisper White, Chocolate Chip, Regal Rose Cardstock, Sweet Always DSP
Ink: Chocolate Chip
Acessories: Eyelet Punch, SU Markers, Stampin' Pastels, Dimensionals, Ribbon
1. Score 4 1/4 x 11 piece of Whisper White at 5 1/2 and fold on score line.
2. Stamp cupcake image onto a 1 3/4 x 3 piece of Whisper White. Color with SU markers and Stampin' Pastels.
3. Adhere to 2 x 3 1/4 piece of Regal Rose
4. Use Eyelet Punch on the bottom of a 4 1/4 x 3 piece of Chocolate Chip. Adhere piece of 4 1/4 x 2 Sweet Always DSP to center.
5. Adhere DSP piece to cardfront.
6. Use SU Markers (Pumpkin Pie, Regal Rose, Chocolate Chip) to color directly onto Celebrations Stamp and stamp above DSP.
7. Wrap ribbon around entire card and tie to the left side of the DSP.
8. Adhere the image using dimensionals.

Saturday, April 25, 2009
Square Birthday Card
I saw a layout similar to this in the newest issue of the Stampin' Up demonstrator magazine I get each month and decided to try it out. Of course once I got started I changed some things, but I really like how it turned out. I used one of my favorite sets "Crazy for Cupcakes" as I'm using this for one of my customers' birthday. Starting tomorrow I will only be working on samples for my May workshops, so you will be seeing a lot of Walk in the Park DSP and Great Friend/Summer Love Stamps and Rub ons. I also will be going to Jolene's first workshop tomorrow, so I will post our make-and-take too :)

Stamps: Crazy for Cupcakes
Paper: Pink Pirouette, Whisper White, Chocolate Chip, Barely Banana Cardstock; Sweet Always and Sale-A-Bration Designer Series Paper
Ink: Chocolate Chip
Accessories: 1 1/2 inch Circle Punch, 1 inch Circle Punch, Ticket Corner Punch, Big Shot, Scallop Circles #2 Die, Chocolate Chip Ribbon, Liquid Applique, Embossing Gun, Stampin' Pastels, Blender Pens, Dimensionals
1. Score 8 1/2 x 4 1/4 piece of Pink Pirouette Cardstock at 4 1/4 and fold on score line.
2. Cut a 4x4 square of Sweet Always and Sale-A-Bration DSP. Cut one in half diagonally and adhere to the other.
3. Wrap Chocolate Chip ribbon diagonally across DSP where the two designs meet. Adhere DSP to card base.
4. Run a scrap piece of Pink Pirouette through the Big Shot using the Scallop #2 die. Stamp cupcakes directly onto scallop and color with Stampin' Pastels and Blender Pen.
5. Apply liquid applique to "ice" cupcakes and heat with embossing gun.
6. Adhere to card base. Use a white marker to put dots on each scallop.
7. Cut a piece of Chocolate Chip and tie into a bow. Adhere on top of ribbon line, overlapping scallop.
8. Stamp cupcakes on scrap piece of Whisper White. Color and apply liquid applique. Cut out.
7. Punch a 1 1/2 inch circle from Whisper White and stamp sentiment twice in a circle pattern. Punch a 1 inch circle from Barely Banana and adhere to center of sentiments. Adhere cut out cupcake to center of Barely Banana circle.
8. Cut a 2 x 1 1/8 piece of Chocolate Chip and punch the corners with the ticket corner punch. Adhere to back of circles.
9. Adhere sentiment to bottom left of card using dimensionals.
Wednesday, April 15, 2009
Crazy for Cupcakes Workshop
Here is a preview of the projects we will be making this weekend at the Crazy for Cupcakes Workshop! There are two 4 1/4 x 5 1/2 cards, one gate fold card, and one treat bag. Enjoy!

Close up of the 3D icing (it looks way better in real life)

Close up of the treat bag

Saturday, March 28, 2009
Happy Birthday Roberta!
In honor of my upline, Roberta's, birthday (which is tomorrow), I thought I'd share with you the card I made for her. Happy Birthday!!! :)
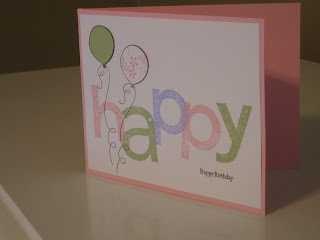
Stamps: Big Deal Alphabet, Crazy for Cupcakes, Lots of Thoughts
Paper: Pretty in Pink, Certainly Celery,Whisper White Cardstock and Hostess Level 1 Designer Series Paper
Ink: Pretty in Pink, Certainly Celery, Bashful Blue, Chocolate Chip
1. Score 4 1/4 x 11 piece of Pretty in Pink cardstock at 5 1/2 and fold on score line
2. Stamp "happy" using the Big Deal Alphabet set in Pretty in Pink, Certainly Celery, and Bashful Blue ink on a 4 x 5 1/4 piece of Whisper White cardstock.
3. Ink only the "happy birthday" greeting on the Cheers to You stamp from the Lots of Thoughts set using Chocolate Chip ink and stamp in the lower right hand corner.
4. Stamp two balloons from the Crazy for Cupcakes set on the left hand side.
5. Stamp the balloons again, this time one on Certainly Celery cardstock and one on the DSP. Cut out the balloon top and adhere over stamped image on the Whisper White.
6. Adhere Whisper White cardstock to Pretty in Pink card base.
Subscribe to:
Posts (Atom)
