Showing posts with label Birthday. Show all posts

Sunday, October 27, 2013

Lollipop Invitation

Could these get any cuter??? These might be one of my favorite invitations I've ever made. I originally wanted to use real lollipops and have the invitation be a sticker on the face of it, but was worried about how they would mail and didn't want people to receive broken invitations, so I went this route.

Bubble Guppy Birthday Invitations

Love these Bubble Guppy birthday invitations!
Click here to see Delaney's first birthday invitations.

Strawberry Birthday Invitations

Strawberry shaped invitations for a "berry" sweet girl! Not sure why the color looks so terrible, because in my original picture it looks normal. The invitations are strawberry red with black polka dots.
 All 50 of them!

Sunday, July 21, 2013

Birthday Card

This is the card I made for Mila's 1st Birthday. It felt good to pull out some of my old card stuff and actually make a card by hand and not on the computer (although, I think it's obvious how much I love MDS!). This card is actually 5x7 and the only reason I made it that big is because that was the only size envelope I had :). I cut a doily in half and wrapped it around the pink cardstock and adhered it to the back. I then cut the banner strips from Stampin' Up Designer Series Paper and added the pearls. The ribbon was tied on and the sentiment was stamped using Chocolate Chip ink. You can't tell from the picture, but the pink cardstock is adhered with dimensionals. The sentiment is from the "Crazy for Cupcakes" stamp set.

Minnie Mouse Birthday

Today was one of my best friends' daughter's 1st birthday party and I had the pleasure of making her invitations. My friend Melissa (I've mentioned her a lot) also is very crafty, so the party was amazing! She actually made the bows for the invitations too. Everything was made on MDS and I think my favorite part are the pearls on the scalloped trim. They were the last finishing touch during the design process. I love the pink and zebra together too! It's hard to see in the picture, but the pink background also has really faint polka dots.
 How cute is the M with the ears?? She had headband "ears" for everyone and lollipop favors.
 Pictures from Mila's first year as well as a frame for everyone to sign. 
 The cake made by Melissa's friend, Lisa.
 Cupcakes made by Carrie (who also made the cupcakes for Slevin's party)
I have two more birthday parties in August that I'm really excited about...but honestly, I'm now starting to look forward to planning Slevin's 2nd birthday party! Why am I crazy?!

Thursday, July 18, 2013

Batman Birthday

I know I say this all the time, but these might be my most favorite invites I've made yet! How cute is little Jack with Batman! The picture definitely makes the invitation, I think. When his mom sent it to me, I knew immediately that I wanted to make the invitation look like a page from a comic book. I'm very pleased with the result. I downloaded some cool super hero fonts and found fun backgrounds on the internet then went to town in MDS! She sent me a text after she picked them up and said that she should have ordered extra because Jack wanted to carry one around everywhere! :) These are 5x7 and were printed on a glossy cardstock which made the colors look even better in person! (For some reason the "Jack and Batman" heading photographed pink, when it's really red.)
 Here are some close ups:

Thursday, July 4, 2013

Construction Party Thank Yous!

I posted pictures of Greyson's construction party a few weeks ago, well here are the Thank You's I made for them. Again, I had to make a layout that included several places for photos because there were so many cute ones to choose from! They were made in MDS and are 5x7.


Monday, June 24, 2013

Construction Party

I absolutely love this theme! This is my friend, April's, little boy and he just turned 2. She took him to her dad's work to get some pictures of him playing with the machinery and getting dirty with his little dump truck. She sent me like 20 pictures and I had to narrow it down...they were all so cute! So I definitely had to create a layout for an invitation that included multiple pictures. As always I used MDS and I made these 5x7 so that I could make the picutres bigger. I think what really makes these invitations is the font. To me a font can make or break a design and sometimes that is the hardest thing for me. I have my favorite ones that I always seem to gravitate towards, but I knew this one had to be different; and no joke, this was the first one I tried. It's called "Cracked". So cute! I also like the push pins. They really look 3D! I actually found it on a Yahoo image search and it was red. I used the recolor tool to make yellow and black ones and then rotated them so that the shadow was in a different position, creating the illusion that they are pushed in different ways. That program is amazing! The only thing I don't like is how dark the writing is over the grey background, I probably should have used a different color or made the background a little opaque, but you can still read it, so I guess that's okay. It just doesn't stand out like I imagined it would. 

These are little "measuring tape" favors that she included in the kids' treat bags. I was able to buy sheets of label paper off of the place I get all of my work printed. Then I just cut them out with my Coluzzle and stuck them over the Bubble Tape! So easy!

 I will be posting the Thank You's in a few days once I know she's sent them out! It's another Greyson photo bomb and so cute!!

Tuesday, May 14, 2013

Polka Dot Birthday

This might be one of my favorite birthday invitations I've made yet! These were for a polka dot birthday party and I love all of the bright colors! I used MDS, as usual, to create everything. The "1" is a clip art that I found online because I couldn't find a font thick enough, even when enlarged, to fit the info in. I think playing with fonts and using various fonts on the same project is one of my favorite things to do!

How fun do all of these look together?! Perfect for a little girl's first birthday!

Monday, May 13, 2013

Birthday Thank You Card

Isn't he adorable?? These are the Thank You cards I made for this birthday. They were very simple to make and that's how Landon's mom wanted them. I used iPhoto to blur out a balloon that was in the background, then inserted the photo into MDS and added the text. I used the "picker" color tool to match the text color to the icing. Once they were printed I rounded the corners and voila! The picture speaks for itself!

Sunday, April 21, 2013

Stamped Candle

You may remember this post from Trinity's Lalaloopsy party last year. Well, guess who had another Lala themed party this year?! Her mom lucked out because now there are actually decorations with Lalaloopsy on them. Everything at the party was super cute. I didn't want to show up without a homemade gift, so I decided to make Trinity something that no one else could buy her...a Lalaloopsy candle with her name on it! Candle making is very easy. You can do it one of two ways: either stamp on a piece of tissue paper or run the tissue paper through your printer (taped to a regular piece of paper) -- for this project, I printed the image. Then cut the image out, getting as close to the image as you can. Position it on the candle and then wrap a piece of waxed paper around the candle and pull it tight in the back. Hold the candle by the waxed paper that is left over in the back and use an embossing gun to slowly heat over the image. It will take 1-2 minutes, but gradually you will see the image magically melt into the candle. Be careful to not overheat. Slowly peel away the waxed paper and that's it! If needed, you can heat over the image slightly to fix any places that the tissue didn't completely melt. 

Bubble Guppies 1st Birthday Invitations!

If Slevin's birthday hadn't been the day before the Superbowl, I totally would have had a Bubble Guppies themed birthday for him because it is his FAVORITE show. So I was very excited when I was asked to make invitations for a Bubble Guppies themed first birthday! Everything was created on MDS and I even downloaded a bubble font to tie everything together. Isn't he a cutie!?


Sunday, April 14, 2013

Doily Birthday Card

Today I was invited to a birthday party for my friend's mom. Melissa always plans the best parties :) it was a great time and everything was so nice. Her mom likes to do craft projects, so I knew she would enjoy a handmade card. This was a very simple card and although I kept trying to add more to it, I ultimately liked the simple look. I used my Stampin' Up markers to color the sentiment and flowers and stamped on the doily (which are my new obsession). I used spray adhesive to adhere the doily to the card. The stamp sets used were Close as a Memory and Celebrations. I finished it off with a Chocolate Chip ribbon and by rounding the corners. I really liked how it turned out. Happy 55th Terri!!!

The inside
Melissa actually surprised me with these doilies a few months ago (she found them at Target). She got me like 8 packs so I see myself using them a lot, and they are the perfect size! She's the best!

Monday, February 25, 2013

Bowling Party Invitations

These invitations are from November, but I just realized I never posted them!! I made these for a co-worker's grandson. I really liked how they turned out. This was one of the first projects I made using My Digital Studio! The invitation is layered on white and red cardstock. 


Don't mind the blue bar that runs through these. I was blocking out her email address. I did these before I discovered how to "blur" out information :)

I also made these Thank You cards to match. It is just a 4 1/4 x 5 1/2 red cardstock base layered with white cardstock and the image designed on MDS. 

Sunday, February 24, 2013

Football Birthday!


I'm finally getting around to posting about my son's first birthday party! This year his birthday fell on the day before the Super Bowl, so it was only fitting to do a football party. I made everything using My Digital Studio. I had a lot of party ideas saved on Pinterest, so it was fun to be able to finally put them to use!

Here are his invitations, which were made to look like football tickets!
This was the dessert table. My friend Carrie made the football shaped cupcakes! On the right is his baby flip book, made with MDS. It is 50 pages long and covers his entire first year. It was a big hit! Hanging behind everything were his monthly pictures, hunt with mini clothes pins. Also on the table is his hospital shadow box and birth print that I made. The cookies were green candy covered oreos piped with white icing to look like field markers. 
Here is a close up of the cookies and the baby book. 
Water bottle labels made with MDS. (as you can tell by the Christmas decorations, I had been working on party stuff for a while! My dining room table looked like a football party exploded!)

These were the favors. I ran the bags through my printer with a football play I found on Google. It's hard to read, but the sticker says "We would like to call a time out to say thank you". The lighting wasn't great in my dining room, but I promise you could read it. Everyone also got a pencil that had footballs on it and said "Slevin's First Birthday" that I ordered from Oriental Trading. 
Inside the bags were Hershey's nuggets that I had wrapped in labels that I made. Such an easy way to personalize favors :)
This was the entry to the party room. I made the chalk sign by painting a piece of thick cardboard with chalkboard paint.

This was the backdrop behind the foot table! It took FOREVER to hang all of those balloons and streamers, but it was so worth it! You can also see off to the right a chain that I had made from brown strips of paper and painted white "laces" on. There were two of those, but I forgot to get a close up of them.

Here is what the room looked like! 
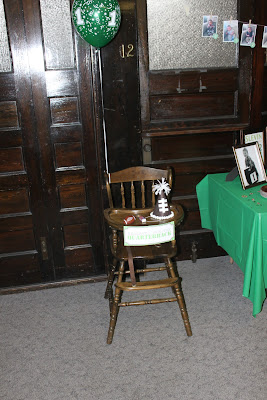
This was Slevin's seat! I made his party hat from felt and little pom poms. I also made his sign using MDS. It says "Reserved for the Quarterback". You can see it better in the next picture.

And, as you can see, he wasn't too thrilled about people singing to him! haha
Deviled "football" eggs! Thanks to my sister for cutting all the chives for these!

Here is me and the birthday boy! :) I can't believe he is 1!!

These are his thank you cards, also made with MDS. I wrote a personal message to each person on the back. 

Tuesday, January 15, 2013

Surprise 30th Birthday

Friday my friend, Carrie, and I surprised our best friend Melissa with a party for her 30th birthday. It was held at a local restaurant, The Wooden Angel. I had never been there before, but the room they has us in was amazing! Carrie and I did candles and various shades of pink roses down the center of the table. It looked so great! We did rose petals and pearls on the cake table (which I don't have a picture of).

We put pearl strands in the flowers as well.
I was in charge of making the favors. I used My Digital Studio to create the little tags for the M&Ms (which were Valentines ones with the red sorted out--who knew there were so many red ones?!). These came together in no time with the scalloped punch. I tied the tulle off with some ribbon and pearls and that was it! I thought they turned out super cute!

Also, on a different note: this is the first post I'm doing from my phone using the Blogger app! Half of the problem with my lack of posting is the fact that all of my pictures are on my phone and I'm rarely on my computer. I don't know what made me check the App Store to see if there was a Blogger app, but I'm glad I did! Hopefully now you will be seeing more frequent posts as I will be able to blog while nursing Slevin at night! I have lots of orders coming in and have been busy working on all of the little details for Slev's birthday party :)

Monday, October 22, 2012

Pumpkin Party


How cute is this?? Made 100% digitally, I used elements from this site. She has a ton of cute free stuff. As much as I like making cards/invitations with cardstock, stamps and ribbons, making them digitally is fun too and the results can be just as impressive and it makes it easy to get a whole bunch done in a short amount of time. (you can click on the picture for a clearer picture...not sure why it's showing up so blurry?)

I always love how projects look once they are mass produced. It just seems like such a great accomplishment, especially when each one is made by hand and even though that's not the case with these, I still think it looks neat.


Monday, September 17, 2012

Tyson's Birthday Card

This card was made for the cutest 4 year old I know, my friend, Kelley's son, Tyson (his sister is Trinity, who I made the Lalaloopsy stuff for). Kelley's mom watches my son and Tyson is his little buddy. His birthday was Pittsburgh Pirates themed, so I knew I had to make a baseball card! The DSP is miscellaneous Stampin' Up from my scraps bag. I made the baseball by cutting a circle out with the Coluzzle. I then used the same size circle and my bone folder to trace where I wanted the stitching to go. I drew little "v's" over the scored line with Bravo Burgandy and then sponged it with Close to Cocoa to give it a worn look. All of the other pieces of the card are also sponged. The flag was made on the computer and then cut out. I punched two holes for the toothpick to fit through and adhered it to the card base. The baseball was adhered using dimensionals.