
Tuesday, March 31, 2009
New Recruit
I am so excited to announce that I just got my first downline! Her name is Jolene and she found me through Stampin' Up's "Find A Demonstrator" feature and my Demonstrator Business Website...how cool is that?! She is so ready to go with this and already has her first workshop booked. I can't wait for her to receive her kit and get started! I definitely never thought I would get a downline within my first month of being a demonstrator! She signed up at the right time, though, because during Sale-A-Bration she got 15% off the kit, plus an additional stamp set of her choice! I also get two free stamp sets: one for getting a recruit during Sale-A-Bration and another as part of the Stampin' Start program! Decisions, decisions!!! I will keep you posted on this new experience! Welcome Jolene! :)
Sunday, March 29, 2009
Thank You Card from Cervantes
As you may, or may not know, I have an 8 month old Rottweiler named Cervantes. We had been having trouble recently keeping him in the basement at night since he could easily open the bi-fold door. I was telling this story at work and one of the Member Service Staff, Annie, offered me her old baby gate from when her kids were little. It works PERFECT! He doesn't even try to paw at it. I think he likes that he can see what's going on. To thank her, I made her this cute gate fold card with a picture of Cervantes behind his baby gate.


Stamps: Fun and Fast Notes
Paper: Apricot Appeal, Chocolate Chip, Whisper White Cardstock and Sale-A-Bration Designer Series Paper
Ink: Chocolate Chip
Accessories: Stampin' Pastels, Blender Pen, Corner Punch
1. Score 4 1/4 x 11 piece of Apricot Appeal cardstock at 2 3/4 on each side. Fold in.
2. Adhere a 2 1/2 x 4 piece of DSP to each flap.
3. Stamp image from Fun and Fast notes onto 2 1/4 x 3 piece of Whisper White cardstock using Chocolate Chip ink and color with Stampin' Pastels.
4. Mat Whisper White onto 2 1/2 x 3 1/4 piece of Apricot Appeal. Mat that onto a 2 3/4 x 3 1/2 piece of Chocolate Chip.
5. Adhere only half of the matted image to the left flap.
6. For the inside I punched the corner of a 4 x 5 1/4 piece of Chocolate Chip cardstock using a punch I had from Michael's. My picture was cut at 3 3/4 x 5 and under it is a 3 x 4 piece of Whisper White cardstock where I wrote my message.
Saturday, March 28, 2009
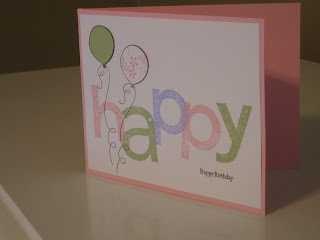
Happy Birthday Roberta!
In honor of my upline, Roberta's, birthday (which is tomorrow), I thought I'd share with you the card I made for her. Happy Birthday!!! :)
Stamps: Big Deal Alphabet, Crazy for Cupcakes, Lots of Thoughts
Paper: Pretty in Pink, Certainly Celery,Whisper White Cardstock and Hostess Level 1 Designer Series Paper
Ink: Pretty in Pink, Certainly Celery, Bashful Blue, Chocolate Chip
1. Score 4 1/4 x 11 piece of Pretty in Pink cardstock at 5 1/2 and fold on score line
2. Stamp "happy" using the Big Deal Alphabet set in Pretty in Pink, Certainly Celery, and Bashful Blue ink on a 4 x 5 1/4 piece of Whisper White cardstock.
3. Ink only the "happy birthday" greeting on the Cheers to You stamp from the Lots of Thoughts set using Chocolate Chip ink and stamp in the lower right hand corner.
4. Stamp two balloons from the Crazy for Cupcakes set on the left hand side.
5. Stamp the balloons again, this time one on Certainly Celery cardstock and one on the DSP. Cut out the balloon top and adhere over stamped image on the Whisper White.
6. Adhere Whisper White cardstock to Pretty in Pink card base.
Thursday, March 26, 2009
Additional Class Added for April
I have decided to have two sessions of my Crazy for Cupcakes class as I already have 4 people RSVP'd and can only fit 6 around my dining room table comfortably with all of the stamping supplies. The additional class will be Friday, April 17 from 6:00-8:00pm. Both classes will make the same projects. Hope to see you there!
Wednesday, March 25, 2009
Sympathy Card
 I am really happy with how this card turned out. Since I will be doing emboss resist at Kim's party, I figured I'd make some other samples of different ways that this technique can look.
 Stamps: Pocket Silhouettes, Close as a Memory
Paper: Bashful Blue, Chocolate Chip, Whisper White Cardstock
Ink: Versamark, Bashful Blue, More Mustard, Old Olive, Chocolate Chip
Accessories: Clear Embossing Powder, Embossing Gun
1. Score 4 1/4 x 11 piece of Bashful Blue cardstock at 5 1/2 and fold.
2. Stamp Pocket Silhouettes along bottom of 3 3/4 x 5 piece of Whisper White cardstock using Versamark ink. Emboss with clear embossing powder.
3. Use sponge or cotton ball to cover the entire piece of cardstock with Chocolate Chip, Old Olive, More Mustard, and Bashful Blue ink.
4. Stamp sentiment from Close as a Memory.
5. Mat inked cardstock to 4 x 5 1/4 piece of Chocolate Chip cardstock.
6. Adhere to Bashful Blue card base.
Acetate Wedding Card
I decided to try this technique called "floating" using a piece of acetate as the base of the card. I think it turned out pretty cute...still not sure if I like the white ribbon on the side or not? If I had white Stazon I would have stamped some sort of swoopy or flower on the acetate, but I don't and anything else just smears. (I might have to add that to my next Stampin' Up order!)


Stamps: Fun and Fast Notes, Congrats
Paper: Whisper White, Cameo Coral Cardstock
Ink: Chocolate Chip Ink
Accessories: Acetate, Stampin' Pastels, Blender Pens, Ribbon
1. Cut and fold acetate to form a 4 1/4 x 4 1/4 square card.
2. Stamp wedding cake from Fun and Fast notes onto 2 x 2 piece of Whisper White. Color with Stampin' Pastels and blender pens.
3. Adhere to center of acetate. Adhere 2 1/4 x 2 1/4 piece of Cameo Coral to the inside of the front of the card, sandwiching the acetate between the two pieces. Stamp "welcome to the wedded bliss club" from the Congrats set.
4. Adhere 2 1/2 x 2 1/2 piece of Whisper White to center of the inside. This is where the written message will go. (When the card is laid flat, all three layers should match up as a 1/8 border).
5. Tie ribbon around crease and tie in a knot.
Spongebob Birthday Invitation
 Well, here he is! I originally had this idea that I wanted to use an actual sponge to stamp the yellow background, but after many failed attempts I gave up and just used yellow cardstock. His shirt, tie, and pants are all handmade, but I'm terrible at drawing and don't have all of the different size circle punches to make his eyes, so I decided to print his face off the internet and cut it out. I think a 2 year old who's having a Spongebob party would like them, don't you?? haha
Tuesday, March 24, 2009
Onsie Cards

Aren't these the cutest things ever? I found the tutorial online and couldn't wait to have an excuse to try it! Luckily, I got an order last night for two new baby cards--one for a boy and one for a girl! The inside says "Happy New Baby."
Stamps: Fun and Fast Notes
Paper: Bashful Blue, Pretty in Pink, Whisper White
Ink: Chocolate Chip Ink
Accessories: Stampin' Pastels, Blender Pen, 1 3/8 Circle Punch, Scalloped Circle Punch, Brads
As I said, I found the template for these online and want to give credit where credit is due. For directions on how to make them visit http://laurenm.blogs.splitcoaststampers.com/2008/02/05/ They were surprisingly easy to make!
Monday, March 23, 2009
April Class Date
 I have set April 18 from 12:30-2:30pm as the date for my next Stampin' Up workshop. We will be making 3 cards along with a card box using the Crazy for Cupcakes set. I found a really cool technique to make "icing" using flour, salt, and water. I need to try it here in the next few days to make sure I can make it look as good as it did in the tutorial...you know how that goes! The cost will be $12 per person or $10 if you bring a friend! Check my Stampin' Up Demo Site for more details. http://renaewilson.stampinup.net
 Other than that I've been busy working on some invitations. I just finished an order for a July wedding and have started on my next one which is an October wedding. Just waiting to hear back from the bride with what she thinks of the sample I made her. I also have an order for 15 Spongebob Squarepants 2nd Birthday Invitations. I'm super excited about those. I have the idea of how I want them to look, just haven't made a sample yet.
Sunday, March 22, 2009
Emboss Resist
Well, from my first workshop, I got a booking for my first party! I guess it really wasn't from my workshop, because Kim had told me ahead of time she was planning to book, but anyway...her favorite technique is emboss resist, so that will be the make and take for her party! Here is what I have come up with: 
I used the Flower Fancy set...it's probably my favorite because of it's versatility! The greeting is a little off center and one of the flowers got a little smudged (of course it had to be the one in the middle!), but overall I was pretty pleased with it!
Stamps: Flower Fancy, Heard from the Heart
Paper: Natural Ivory, Chocolate Chip Cardstock
Ink: Certainly Celery, Chocolate Chip, Versamark
Accessories: Clear Embossing Powder, Clear Embossing Powder, Embossing Gun
1. Stamp the big flower from the Flower Fancy set with Certainly Celery all over the front of the Natural Ivory cardstock (4 1/4 x 11; scored and folded at 5 1/2). Stamp each flower twice before re-inking to create stamped off effect.
2. Stamp same flower with Versamark Ink onto 3 3/4 x 3 piece of Natural Ivory cardstock. Emboss with clear embossing powder.
3. Using a sponge dauber or cotton ball, spread Certainly Celery ink around centers of flowers and Chocolate Chip ink around the petals until you have desired effect.
4. Adhere to 4 x 3 1/4 piece of Chocolate Chip. Run your fingernail around the edges to distress.
5. Adhere to top half of card and stamp greeting from Heard from the Heart set on the bottom using Chocolate Chip ink.
Egg-cellent Easter Workshop
 I held my first workshop as a Stampin' Up demo on Friday and it went so well! There were 6 people here (even though my mom didn't participate...she decided to be the photographer! lol). We made 2 cards and 1 treat pouch using the Sale-A-Bration paper and the Egg-cellent Easter set from the Occasion's Mini.
I displayed these projects to use as a door prize. They were created using my Big Shot as well as Sale-A-Bration paper and Congrats stamp set (although, the flowers were from the Flower Fancy set). Congrats to Jen who won them!

Everyone also got a little Thank You note made by stamping onto notebook paper. I thought they turned out really cute!

Stamps: Lots of Thoughts
Paper: Natural Ivory and Bashful Blue Cardstock, Notebook Paper
Ink: Chocolate Chip
Accessories: Bashful Blue Ribbon, Brads
1. Score 3 x 6 Natural Ivory cardstock at 3 inches to create a 3 x 3 card.
2. Take a scrap piece of Bashful Blue cardstock and tear it along the bottom. Run fingernail along other edges to create distressed look.
3. Stamp greeting on notebook paper near torn edge. Cut to size. Adhere to Bashful Blue so that there is some overhang.
4. Punch two holes using hole punch into Bashful Blue right below notebook paper. Attach brads.
5. Adhere Bashful Blue to card. Tie ribbon in a knot and adhere on corner of notebook paper.
First Post
Hi All!
I have been obsessed recently with reading blogs (especially those of other Stampin' Up Demonstrators) so I decided to start my own! Follow me as I host workshops and parties. I will post as often as I can and keep the cards/projects coming! I will post instructions for all projects except those that are included in my workshops. If you are interested in attending one of my monthly workshops, visit my Stampin' Up Demonstrator site for the schedule.
Love, Renae
Subscribe to:
Posts (Atom)
