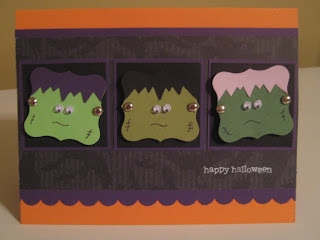
 Happy Labor Day Everyone! I hope you enjoyed some family time and got to relax. I am so excited to share this Halloween card with you today! I made a full size Frankenstein card last year at Roberta's technique class. I thought it would be fun to make a mini size Frankie this year. I absolutely love the little googley eyes! Originally I had punched a hole punch size circle and colored the black part with a marker, but adhering them was almost impossible (and I'm going to be making quite a few of these for one of my customers, so I knew I had to find another option). Today Jen, Mel, and I went to Pat Catan's (long story, but it was actually to keep Mel out of the house so my Uncle could prep for her surprise birthday party--I will be posting the gift I made for her after I give it to her, so watch for that in a few days, it's super cute)...anyway...I was in googely eye heaven! They had 100 different sizes I swear! I got these small ones and the next size up for use on another card that I will be sharing with you soon.
Here is the card from last year. Isn't he cute too?? He's made out of all circle punches.

Stamps: Teeny Tiny Wishes
Paper: Pumpkin Pie, Elegant Eggplant, Basic Black, Garden Green, Green Galore, Old Olive, Pale Plum, Cast A Spell DSP
Ink: Whisper White
Accessories: Scalloped Edge Punch, Curly Label Punch, Silver Brads, Chocolate Chip SU Marker, Mat Pack and Paper Piercer, Googley Eyes

1. Score a 5 1/2 x 8 1/2 piece of Pumpkin Pie at 4 1/4 and fold on score line.
2. Cut a 3 x 5 1/2 piece of Cast A Spell DSP and two 1 1/2 x 5 1/2 pieces of Elegant Eggplant. Scallop Punch one of those pieces. Dry fit the scalloped piece, DSP, and other Eggplant piece onto the card so that there is about a 1/4 of an inch of Pumpkin Pie on each side. Adhere to card base once you are happy with placement.
3. Cut three 1 5/8 square pieces from Basic Black and three 1 3/4 square pieces from Elegant Eggplant. Adhere together and then adhere to DSP.
4. Punch six Curly Labels (one each of Old Olive, Garden Green, Green Galore, Pale Plum, Elegant Eggplant, and Basic Black). Cut the purple and black pieces in half and then cut one edge to be jaggedy hair. Adhere hair onto green pieces.

5. Use Mat Pack and Paper Piercer to pierce a hole on each side of the label punch and adhere silver brads to form Frankie's bolts.
6. Adhere googley eyes and use Chocolate Chip marker to create mouth and stitch marks.
7. Adhere Frankie's to the square mats.
8. Stamp the sentiment from Teeny Tiny Wishes in Whisper White onto bottom right corner of DSP.


Oh my gosh you are so clever. I love these mini Frankies. I am going to have to CASE. I don't have that DSP, but I think I can improvise with what I have on hand!
ReplyDeleteThank you for such detailed instructions. I really love this project. I must admit that I am struggling with the hair on any size of the Frankies. Do you have any tips or tricks for cutting it to make all three look so consistent? If so, I'd love to hear them. It almost looks like you used a pattern!! Thanks again for the inspiration!!
ReplyDeleteJudy
lifesabeach32940@cfl.rr.com
The mini Frankies are way toooo cute. Thanks for the great directions. I was going to ask about the hair and see that someone already asked. Is there a trick to it?
ReplyDeleteI also like your blog layout. In particular the border around your pics. How do you do this? I also can't figure out how to get my text to go along the side of the pics. Looks like I not only want tocase your Frankies, but your blog style as well! LOL!!